Tuesday, December 27, 2011

SPECIAL CARD

Joan came over today and asked me to design a thankyou card for her to give to her son. After hinting that her toilet seat was deteriorating, she came home the other day to find he had purchased a new seat and installed it for her!


I think these pictures speak for themselves!

Sunday, December 25, 2011

MERRY CHRISTMAS!

Hope you're all having a wonder-filled Christmas and that Santa brings you lots of new stamping toys!

Don't forget to take the time to remember what it's really all about...

Friday, December 16, 2011

HELLO AGAIN!

We're back from Prague, but one of my "souvenirs" was a bad cold which developed into an ear infection on the plane ride home (ugh.) I'm finally over the worst of it, but now I'm way behind in my Christmas shopping. That's why I haven't posted lately.

The tree is up and decorated, the weather has turned mild again, and I'm slowly getting caught up with everything that needs to be done. I'm looking forward to doing some stamping later on today, just for my sanity.

Stamping withdrawal is a serious malady that can only be cured by--you guessed it--stamping! I'll have some new posts later on tonight...

Friday, December 2, 2011

HAPPY DECEMBER!

It's beginning to feel like Christmas. All 100 of my cards were either mailed yesterday or hand-delivered earlier. Whew! I'm glad that's done so that I can move on to other things.

First, we head for Prague this afternoon for a week with family there. After spending Black Friday addressing Christmas cards, I spent all day in the malls on Cyber Monday. It was great! I had the stores to myself, with sales people eager to help me find what I needed and sale prices still in effect...to say nothing of less exposure to flu viruses...works every year.

As soon as we get back, I'll finish Christmas shopping for family on this side of the Atlantic...after I put up the tree, that is; then concentrate on enjoying the season for its true meaning: the birth of our Savior.

Oh, and I'll be stamping, of course! Stay tuned...

Saturday, November 26, 2011

THREE OF A KIND--Wreath


I'm so pleased with the versatility of this die for getting so many different looks.

The red card on top has a silver wreath cut from some silver glitter paper I bought last week. I added just a few dark red gems for embellishment.

The blue gate card is one of my favorites so far. The gems are tiny crystals and silver beads, with silver twine under the blossom.

Finally, the top note folded over is a deeper red than it looks here, which tones it down well. There is a smattering of tiny gems and beads around the wreath.

I had a little trouble at first with this die. One section wasn't cutting all the way through, and it took me a long time to get it to release. Since only one side was getting hung up, I tried putting it through the Cuttlebug, then turning the plates around and running it through again so that the "hung up" side was reversed. It worked! The wreath just popped right out after that. So if you have a similar problem with any of your dies, it could be your machine. I'm not a mechanic, but my guess is that the rollers are tighter on one side than the other, making it cut unevenly. Hope this tip helps!

Thursday, November 24, 2011

HAPPY THANKSGIVING!


One of my favorite hymns that we sing regularly at women's Bible Study is "Count Your Many Blessings, Name Them One by One..." Being an American, we have more blessings than we could possibly count in just one day. Being a Christian, we have more blessings in Christ than we could possibly count in all of eternity!

Being a stamper, I am thankful for all the Lord has provided in the Stamping Tower. Most of all, though, I'm thankful for YOU!

Tuesday, November 22, 2011

FIRST CARD WITH NEW DIE


Not bad for a first attempt. I cut the wreath using this Memory Box die and some light green cardstock. I then painted the flowers with Twinkling H2O's over the green cs.

After adding some pearls (see previous post) and attaching a Hero Arts flower on the left side, it was almost done. I glued the wreath to a black cs scalloped circle and mounted it to the card with dimensionals. Although you can't see it very well here, I also added a gold twine bow behind the white flower.

This has been added to my Christmas card box, bringing the total count so far to 64--only 36 to go!

One reason for choosing this die was for its versatility throughout the seasons. I can "see" it with Spring flowers, pastel summer blossoms or even autumn leaves.

Saturday, November 19, 2011

Money-saving Tip


Okay, the secret is out! Here's my source of inexpensive mini gems and pearls.

All I do is snip between the dots to separate them and remove them with a craft knife to place on a card. The white pearls can be colored with Bic or Sharpie pens to match your design.

Shown here are white and off-white pearls (small and large) and small crystal gems in red and black.

Having an inexpensive source like this allows me to be more generous in applying them, plus they are small enough to be postage friendly.

Friday, November 18, 2011

Three of a Kind--Trees

These three cards could not have been easier. In fact, the hardest part was getting the gem off the plastic strip for the tag on the first card!

For the second card, I used several markers for the "leaves" on the ground. The snow scene was done with glitter paper for the bottom third and a snowflake sticker in the upper right corner.

It's been fun experimenting with this die cut tree!

UPDATE: to attach tree, I used two tiny pieces of 3m photo mounting tape at the base of the trunk and left the branches loose.

Thursday, November 17, 2011

Winter Tree


Here's the first card I've made with the other new toy that came yesterday. (See previous post.)

Using the "Twiggy Tree" die from Memory Box, I ran it through the Cuttlebug and carefully detached the tree from the die. After tearing a piece of scrap dsp and mounting both on a Soft Suede card base, I spread some Stickles "snow" along the tear. (Too bad it doesn't show up here because the sparkle really makes this card.) All I needed next was the greeting.

After stamping and embossing the greeting, I used the slot punch for both the top and the Soft Suede underneath. To make the bottom piece appear larger than the top, I punched it twice at the edge of the cs slightly more than half for each. Fitting the two pieces underneath the greeting gave it the border it needed.

Done!

Wednesday, November 16, 2011

Three of a Kind--Hero Arts Fern

Some new "toys" came in the mail today, and these are the first three cards I've made with them.

First, the one on the bottom which was stamped in light green ink on light green cs. The stamp has a matching die, so I used it to cut out the fern and mount it on contrasting dsp with dimensionals. After adding the flower, some pearls a bow and a greeting, I set it aside to make another card.

The second card is in the upper right. I inked up the stamp with Tim Holtz distress inks, first Peeled Paint and then on the edges with Tea Dye. This time I mounted it on pearlized paper over a darker dsp and added the embroidery floss, greeting and pearls.

For the third card, I stamped the fern in green and clear embossed it. Then I used the die to create the overlay, which is mounted with dimensionals over the stamped image. The little "hello" tag was stamped on silver foil paper and mounted with another dimensional. I had a green gem that matched the ink I used, so I added it to the tag.

I really enjoy using stamps with matching dies!

Christmas Card Design


Here are two variations of the Christmas card I'll be sending out this year. The first is just a simple image over a piece of dsp from Basic Grey. For added interest, I used a contrasting strip of dsp across the middle and popped the image over it with dimensionals.


The second card is a gate fold card using another dsp design from the same Basic Grey "Jovial" pad. The designs in this collection are so pretty, I've been using them for variety as I make my own cards. It helps to keep things interesting as I go along!

Sunday, November 13, 2011

Peg Stamp Wreath


This top fold card was done with just two peg stamps: a (green)holly sprig and some (red) berries. I plan to send it to someone special.

First, I ran a 4 x 5 1/4" piece of white through the CB using a snowflake folder. Then I used a Nestie for the scalloped circle cutout to use make the overlay. Using the two peg stamps, I created the wreath and popped up the overlay on top.

The bow was made using green embroidery floss and red metallic twine tied together and added with a glue dot. After cutting the bottom edge with deckle scissors, I stamped a border along the bottom of the inside of the card to show when the card is closed.

Enjoy!

LESS IS MORE--Leaves


Using the embossing resist technique, I thought I'd try using the colors of a Royal Satin Kaleidacolor pad just to be different. After sponging on the colors, I sprayed the card with Glimmer Mist. Though it doesn't show up in the photo, it gives the card a bit of shine. I then spattered some blue ink over the open areas.

After stamping the greeting, the card was done. I must say, though, that staying with just one layer is really the hardest part of the challenge!

For more cards submitted for this challenge, go to Less Is More HERE.

Saturday, November 12, 2011

Stamp-a-Stack Designs


Isn't this little guy adorable?! The penguin was made using the SU owl punch with black and white cardstocks, clipping off the ears to turn the owl into a penguin.

The background paper was purchased at Hobby Lobby, as were the self-stick snow flakes. After tearing the white cs and layering it over the dsp, I used Crystal Lacquer as a glue for some chunky "snow" glitter. Then, I assembled the penguin and popped him up with a SU dimensional. The inside greeting is "Warmest Holiday Wishes" stamped in blue.

The second card is a folio card with a heart theme. A piece of 4 1/4 x 11 cs, scored at 5 1/2 and 6 1/2, has the saying as its main image. For the left fold, a 2" strip of dsp covers the folded portion, and a piece of red embroidery floss is wrapped around the inside fold. I chose a holly dsp (not shown here) to coordinate with the heart stamp on the front.

Inside, the greeting from SU was stamped on the same cs as the sentiment on the front and cut to fit. I punched a heart from a piece of red velvet cs I had in my stash.

I'll be hosting this workshop next Saturday, and I think the class will enjoy making these!

Here's a tip: For times when I want to use a tiny gem, such as the red ones shown on the second card, I cut them from a lettering set purchased from the sticker aisle of our local craft stores. They come in clear, black, red, light blue and pink. The red ones make great berries and the black ones work well with eyes for birds!

DE-CLUTTER DE TOWER!


One look at this "after" photo gives you absolutely no clue as to what the "before" photo would have looked like! Seriously, I was down to a work space the size of a card by the time I got it cleaned up.

The pile to the right of the blotter was piled high with cardstock packages, scraps and Christmas stamps in use at the time. The pile under the lamp was a mish-mash of cards received, in progress and scraps of cards finished. Preparing card kits for mothers classes and workshops left little time to work on my own Christmas cards and even less time to clean up. By the time I get home from the two mothers classes on Wed. I'm usually so tired (it's also a 40-min. drive to the church) I fall asleep on the couch. Add to that a power outage of 8 days, and cleanup had consisted of brushing paper bits and glitter onto the floor between cards!

Yesterday, I finally got the chance to devote an entire day to the Stamping Tower. I turned on some music and started putting things away. What's left on my table now are the things I need for the next round of Christmas cards for myself, 53 to go... After Thanksgiving, the Christmas cards will be mailed out, the tower re-organized completely and my bags packed for our upcoming trip to Prague.

Meanwhile, I'll be posting some of my creations. I hope you enjoy them and glean some ideas for your own projects!

AND THE WINNER IS...

CARD #3! Thanks for taking the time to vote. I'll be posting some new creations later on today.

Monday, November 7, 2011

CAST YOUR VOTE!


Please help me decide which card to use for the Mothers Class by voting for the one you like best!

Results will be posted on Saturday.

Thanks!


(See previous post.)

Sunday, November 6, 2011

Mothers Class Christmas Card #4


This card was made with an angel stamp from last year that I never used and a new sentiment stamp I bought last week at Hobby Lobby. The challenge was to keep it simple with no embellishments as a reflection of the simple birth of our Saviour. After some experimenting, here's what I finally came up with.

First, I stamped the angel with Versamark ink, filling in the upper left corner of the Garden Green cs. To avoid covering up the angel too much and keep it balanced, I stamped the sentiment lower and to the right using black ink. I then sponged the edges of the cs with Garden Green ink.

After also sponging the edges of a piece of K&Co. dsp with the same ink, I taped it to the front of a plain white card. Then I mounted the finished image over it with dimensionals.

Although I'm happy with the design of this card, I think I'll try it in a lighter color to make the sentiment easier to read. Maybe a blue?

(Check back later for the follow-up. I plan on doing a few different versions and having a vote.)

Mothers Class Christmas Card #3


One of the moms at Mothers Class last week lent me this gingerbread man stamp to experiment with, and here's what I came up with.

First, I ran some light green cs through the Cuttlebug in a Swiss Dots folder after using a scalloped circle Nestabilities die. Then I placed it over a white card base, lightly marked 4 dots around the opening and set it aside.

To start, I used the wreath from "Sketch It" and stamped it in Soft Leaf ink. Using the gingerbread stamp, I inked it in Chestnut Roan and stamped it around the circle beginning with the top one first, then the bottom one, then the sides. The second four fit in between, making a fairly even circle. I stamped an extra on a piece of white scrap and cut it out. After coloring the eyes black and the buttons red, it was time to assemble the card.

After mounting the green overlay with dimensionals, I added the bow using metallic red cording mounted with a glue dot. The greeting was stamped in black, punched out and attached with SNAIL adhesive.

For the extra gingerbread man, I added tiny black and red gems and mounted it with dimensionals. After stamping "Wishing you a festive Christmas & blessings in the New Year," the card is now ready to present to the class for the 3rd project.

October Snowfall


Sunrise illuminated this snowy scene in front and back, while the sound of generators could be heard throughout the neighborhood.


If this is what October looked like, I can hardly wait to see what December brings!

Eight Days to the Hour!

You're the first to be notified that our power is back up after 8 days!

As Rick just said, longer than Jonah was in the whale and one/fifth of the time Noah was without TV on the ark. Of course, Noah didn't need to watch the news--he WAS the news!

Whew! I hope it stays on so we can shower.

Cards will be appearing later...

Friday, November 4, 2011

Power Update

Just got word yesterday that, due to 3 poles being snapped down the street from us, it will be next week before power is back up on our end of the street. One of my friends who got power on Wed. Treated me to a hot lunch and the use of her washer/dryer yesterday. Hooray for clean underwear!

Thursday, November 3, 2011

Counting Blessings

Here are some of the myriad of blessings I've been counting while awaiting power to be restored:

Bright sunshine
Mild outdoor temps
Good friends and neighbors
Warm, furry lap sitters
Our generator, run by my husband every few hours
No damage to our house or cars
Plenty of food, even a few hot meals out
Stamping supplies galore
God-given sense of humor
...and lots more!

For what are you most thankful today?

Wednesday, November 2, 2011

Still without power

As soon as power is restored, I'll post some pictures of the 10 inches of October snow we got here in Northwest New Jersey! Very inconvenient, but good for stamping in the sunlight...

Wednesday, October 26, 2011

Square Envelope


Inspired by watching a tutorial on converting a standard invitation size envelope into a square, I made this square card and its matching envelope. There's also an embossed butterfly just below the flap to coordinate with the saying in the card.

The leaf was clear embossed and sponged with autumn colors to make it "pop." After attaching the embroidery floss and faux tag (held on with a glue dot at the top) I used SU dimensionals and mounted it on the card at an angle.

For the inside, I typed in Fall colors: "Falling leaves are Autumn's butterflies... Happy Autumn Birthday."

This is the last of autumn cards for me. On to Christmas now...


NOTE: This envelope cost an extra 20 cents in postage, so it wasn't postage friendly after all!

Tuesday, October 25, 2011

Mothers Class Christmas Card #2


For Mothers Class tomorrow, we'll be making the embossing resist cards shown in the previous post. Meanwhile, I've started working on Christmas designs.

Next week for Mothers Class, we'll be starting our collection of two Christmas cards per week. This one fit the bill for being attractive, easy to do and easy for me to prepare ahead of time.

Using just the leaf from the SU "Sketch It" set, I stamped first in red for the blossom and again in green for the two leaves. After cutting them out and sponging them lightly, I set them aside for assembly.

Next I punched the border of the white strip with the Martha Stewart punch and ran it through the Cuttlebug in the Swiss Dots folder. I attached it to the card front, leaving just enough space for the narrow foil trim.

Then I added the poinsettia and leaves, using SU dimensionals for the flower. I stamped the greeting, punched out the scalloped oval and added it to the card with dimensionals. Gold glitter was used for the flower center.

We have a new saying for Mothers Class: "If it's raining, it must be Wed." Not exactly original, but all too appropriate. Rain is forecast for tomorrow again!

Saturday, October 22, 2011

FALLING LEAVES


Inspired by a pad of K & Company 12 x 12 designer paper, I mounted some leaves over them for some simple cards. All four leaves were stamped in Versamark ink and embossed with clear embossing powder.

Next, they were sponged with gold and brown inks to make them "pop" as the embossing resisted the ink. Each image was then mounted as shown, using a minimal amount of embellishment.

I plan to use these for November birthdays and note cards. Meanwhile, I'm posting them under "Simple Saturday" even thought I didn't set the timer. Stamping and assembling in assembly line fashion really is quick!

Sunday, October 16, 2011

SCRAP DRAWER #11


It's been quite awhile since I've done a card using the scraps accumulating in the drawer. This one makes use of some Fall colors and a Martha Stewart punch.


Since it is not postage friendly, I'll be using it as a thank-you note that I can hand deliver.

Monday, October 10, 2011

AUTUMN CARD


After stamping the oak leaves from the French Foliage set and cutting them out, I sponged the edges with Tea Dye Distress Ink to give them some definition. I then attached them on the left side, one with a glue dot, the other with a dimensional. The greeting was stamped with dark brown ink and the embroidery floss was added. The corners were rounded to accent the scallops on the designer papers.

Although the card looked "okay" at that point, I felt it needed a little more interest. While I don't usually use a lot of gems on one card, this time it was just what the card needed...and it's still postage friendly!

Thursday, October 6, 2011

DE-CLUTTER CHALLENGE


I just cleaned out my desk drawer and roll top, so I thought it would be a good idea to challenge ourselves to clean out some drawers this week. How 'bout one a day???

In approaching my desk this morning, I brought a garbage bag with me and started to sort out one area at a time. First, I emptied the drawer onto the dining room table. Using a plastic tray for the items I would keep (like pens, pencils, paper clips, etc.)I decided piece by piece whether to keep or toss. Surprisingly, more than half was tossed--like "dead" rubber bands (they dry out after a few years!) and old receipts, paper bits, etc. You know...

Now that I'm done, I have much more space--not to fill, but to keep open so I can see what I do have!

Remember this "rule": store like items with like. Shallow plastic containers work well for pens and pencils, sandwich containers for coins, paper clips, or other small items, zip-loc bags for other odds and ends.

And here's a word of encouragement--I found an old envelope with $30 CASH in it!!!! Shhhh...don't tell Rick!

Wednesday, October 5, 2011

Taking It To the Top--Vellum Flower


After posting this card for the Less Is More challenge, I decided to step it up a little.


First, I stamped another Large Flower on vellum with Versamark and embossed it with white. I cut it out, attached it to the card and made a new flower center with a scrap piece of dsp.


Next, I added the rest of the matching dsp to the inside right edge and cut away part of the front with deckle-edged scissors. The final touch was to add silver cording on the inside edge, a little different placement than usual.


I liked it either way, but I think the vellum added some style!

Tuesday, October 4, 2011

DE-CLUTTER DE HOUSE

Now that the summer heat and humidity have subsided, clutter is calling again! It's time to start another de-cluttering series--are you up for it?

I've already started the Great Autumn Purge with the upstairs TV room that also doubles as a guest room. After investing in a set of coasters designed for moving heavy furniture, I was able to easily slide furniture around to make it more roomy, vacuuming the carpet as I rearranged the room. Soon it will be time to move the winter clothes back to the bedroom closet in exchange for the summer clothes there.

If you leave your comments citing your most challenging clutter spots, I'll try to come up with some creative solutions. After all, stampers ARE creative, right? Then, as we de-clutter together, you can also leave some of YOUR creative ideas and solutions! ARE YOU READY?

Saturday, October 1, 2011

LESS IS MORE--Eye Color


This Less Is More challenge is to make a card that is your eye color, although the exact shade isn't necessary. I was going to post a photo of the card held up to my face, but my eyes are way too red with allergies. (Maybe I should have made a red card!)

First I stamped the background with Versamark using the "Filigre" stamp from Stampin'Up. Next, I stamped the Hero Arts "Large Flower" with black ink. Using a green Spica pen, I filled in the center outline. Then, using a glue pen, I added Daffodil Yellow glitter in the center (although it looks white in the photo.)

With a GellyRoll glaze pen, I filled in the double lines on each petal of the flower for a subtle effect.

Finally, I stamped the greeting on the bottom right. Done!

SIMPLE SATURDAY #23

Monday, September 26, 2011

Halloween Joy Fold Card


This is one of the Halloween projects I designed for the Mothers Class. There are lots of pieces to assemble, but it should be an easy project.


The cat, pumpkin and "Eek" are stickers from a K & Co. pack I picked up at AC Moore. The bats are stickers from Jolee's Boutique. The purple gems are from Martha Stewart. The dsp is from a 12x12 pad also from K & Co. The stamp is from SU, "Hand-Penned Holidays."

Tuesday, September 20, 2011

French Foliage Thankyou


Fall is in the air, so it's time to get out the browns and oranges! This stamp set works well for any season, but is especially nice for Sept. and Oct. cards. All stamps and papers are from StampinUp! The inks are from a Kaleidacolor rainbow pad, Cappucino.

Enjoy!

Friday, September 16, 2011

Halloween Treat Cup


Here's one of the projects we made at Technique Class last night--LOVE it!

Cyndy had all the pieces ready for us to emboss, decorate and assemble. The wings were shaped with a circle punch, embossed with the spider web ef and attached to the cone. The "bat" was then sprayed with silver Smooch, the ribbon was attached with black brads and the eyes and fangs were added. Too cute!

I plan to use this for one of the Mothers' Class projects next month.

BTW, have you signed up to follow by email? (above right)

Sunflowers #3


Last time for the sunflower stamp! (...but not in real life...) Can't wait to see what the moms do with this stamp!

Thursday, September 8, 2011

Sunflowers #2


As you can see, I just LOVE this sunflower stamp from SU! While waiting for the sun to return and the rain to stop, I decided to make a few more cards with this giant stamp.

First, I applied watercolor crayons directly to the rubber. Then I spritzed the stamp with water and laid the paper over it. I spritzed again (lightly) and made a second print for a more subtle effect on a second card.

After cutting each image down to the size I liked, I mounted them on the cards as shown. For added interest, I stamped the bees, one in black and one in brown, cut them out and applied Stickles to the wings. While letting the Stickles dry, I assembled the cards.

I ran the edges of the first image across the brown ink pad. After mounting a yellow strip across the brown cs, I tied the embossing floss around it. Instead of using a double strand of the 2 colors, I did each separately for a different effect. After mounting the sunflower image with dimensionals, I added the sentiment and the bee. Inside, I used part of the strip I cut off for a 1/2" x 4" piece for the greeting and signature.

The second card was a bit more challenging. Since the image was so faint, I used brown ink for the bee and sentiment. The brown cs border, two-tone gems and yellow embroidery floss helped make the card "pop" after using brown ink for the splatter effect on the pale yellow card base. The completed image was mounted with thick dimensionals for a higher "lift."

The sun still isn't out, except for a brief "tease" earlier; but at least these cards make me feel a little sunnier!

Thursday, September 1, 2011

OUR POWER IS RESTORED--finally!

After five days of roughing it, we're very happy to have electricity once again. Our generator held up beautifully, allowing us to have foods stay cold or frozen, to watch TV, to have running water and to have one outlet for a lamp. I'm thankful for the beautiful weather that followed the storm, so we could use the grill for cooking. Also, that we had no damage to house or cars. For further deets on how we coped, check out the Fox Mountain blog.

Meanwhile, I used the sunlit hours to stamp away in the dining room. What better way is there to spend time in the aftermath of a hurricane!

Wednesday, August 17, 2011

Taking It to the Top--Christmas

When I finished this card, it just seemed to be missing something; so I redid it in steps:


First, I cut off the front panel and remounted it on Cherry Cobbler cs. Then I changed the sentiment and stamped it on a Nestie label. After I sponged the edges with matching red ink, I attached it with SU dimensionals. Then I decided the label was too big for this card, so...


... I moved the label to the inside and used my oval punches for a simpler greeting. I stamped the holly and berries with peg stamps and added some sparkle with green and red Spica pens. To balance it out, I also added some black dots in the upper right corner with a black Spica pen.

BTW, Spica (brand name) pens are a great way to add subtle touches on a card. Another handy tool is the plastic grid sold for cross stitching (?), which I used for the dots in the upper right corner. I sometimes use it for dots and/or dashes around the edges.

Tip: It's amazing how some household items wind up here in the tower, like the lint roller I use for picking up stray powders or paper bits off my work space. What non-stamping items do you use? Leave a comment! (Also, don't forget to sign up for email updates up at the top.)

Monday, August 15, 2011

Three of a Kind--French Foliage


Another set I ordered was French Foliage and a pack of Certainly Celery cs. What I love most about this set is its versatility--it can be used for Spring, Summer or Fall, depending on your choice of colors.

The first card is super simple, and will lend itself to a "Taking it to the Top" challenge. Using three colors from a Kaleidacolor Fresh Greens inkpad and Certainly Celery cs, I assembled the card as shown. Check back on Thursday to see how I step it up.

Next, are two wreaths using two different leaves. I thought it appropriate to use French Script for the background on the one with the Paris cancellation mark. The other features pearls for the center with a sentiment stamped in black and embroidery floss on the fold. This one is my favorite.

Jackie and I thought this would make a great Mothers Class project in the Fall with autumn-colored inks and cardstocks.

Saturday, August 13, 2011

Three of a Kind...


...but who's counting!

As soon as UPS arrived with my StampinUp order, I called Jackie with the news--and you all know it IS news whenever new stamps arrive! I packed up my supplies and headed for her dining room table to "play." At first, Jackie and I weren't too sure what to do with this giant sunflower stamp. What started out as an experiment turned out to be five cards, all different.

"Wishing you blue skies..." was done with watercolor crayons directly on the stamp and spritzed with Glimmer Mist. After stamping the greeting with Chestnut Roan chalk ink, I layered it on Soft Suede cs for the base.

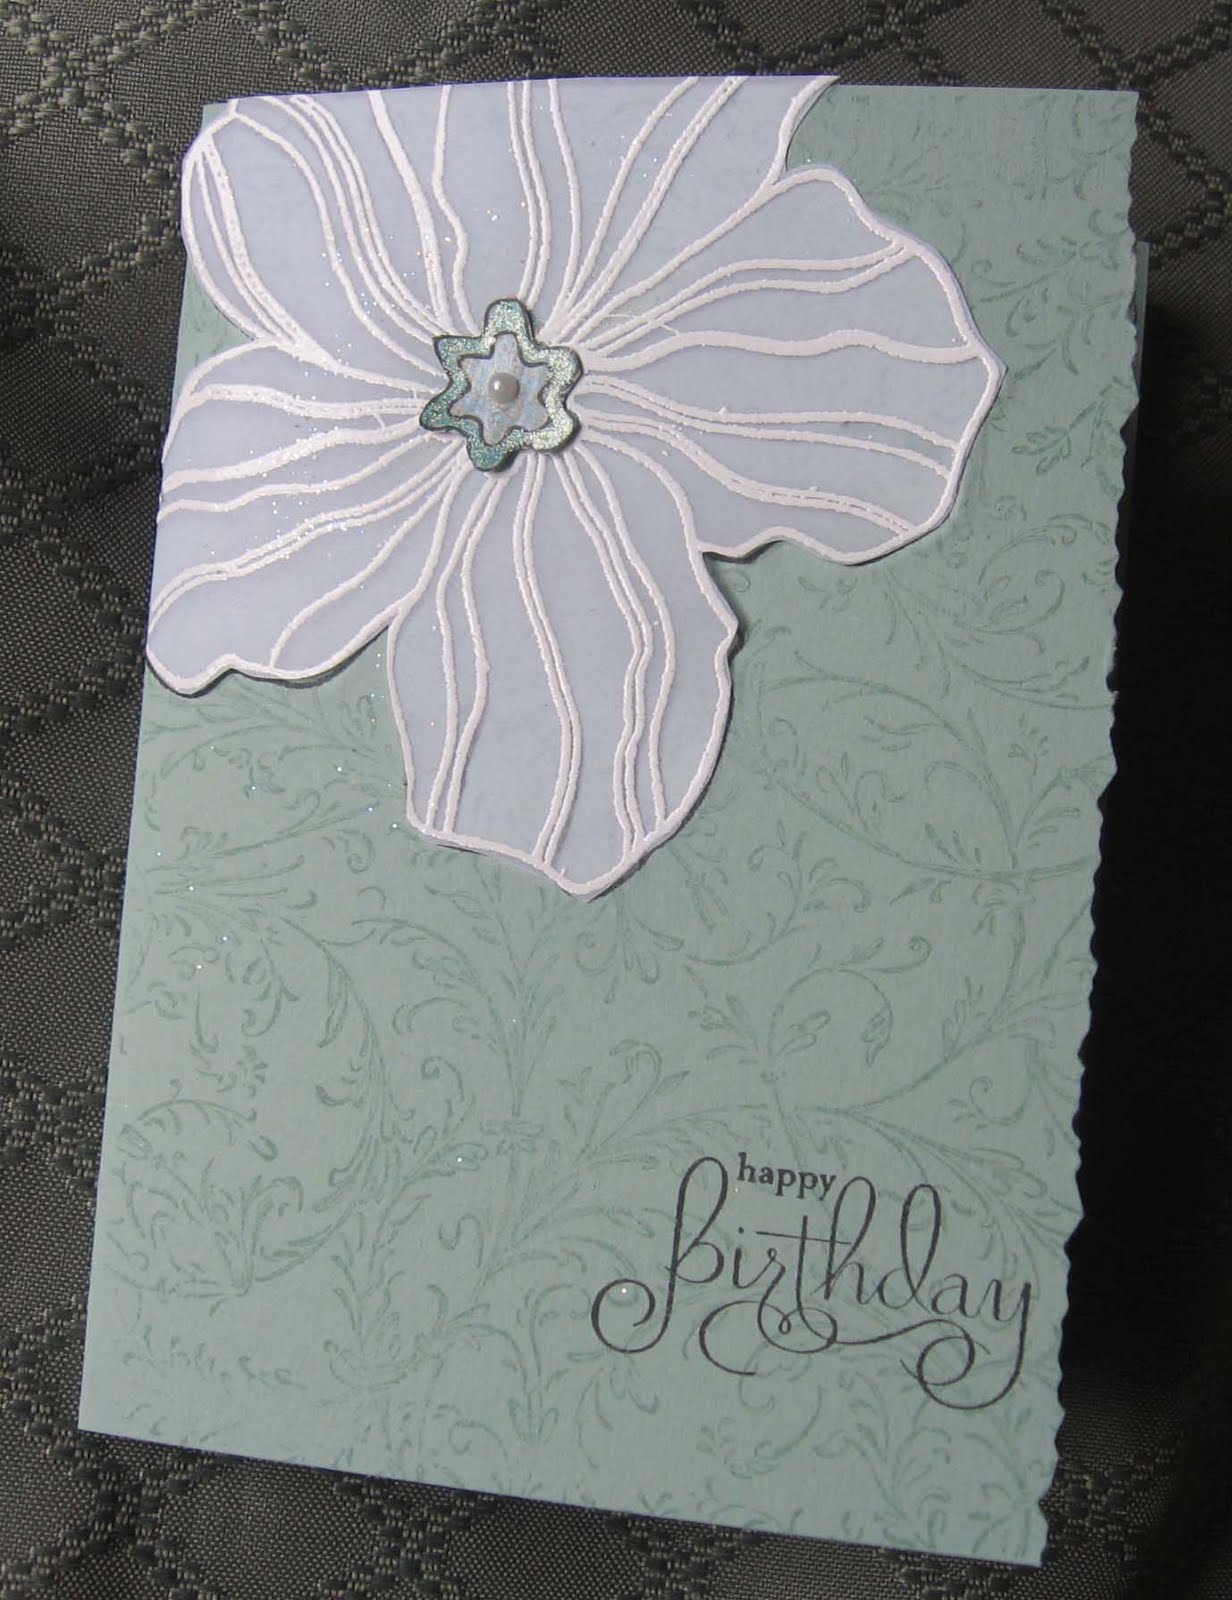
Next came the birthday card using the embossed resist technique over yellow marble dsp and clear ep. After sponging around the image, I tore the left side and layered it on a yellow folio card. which I creased 3/4" from the fold.

Then we did a bd card with watermark ink and chalks. As a full-sized card, the balance wasn't quite right; but once I cut it down to a square card it worked much better. The embroidery floss and distressed edges added some texture.

Then we tried watermark ink on the Soft Suede cs and ran the edges across the ink pad to darken them also. It takes awhile for the watermark ink to really show up; but once it does, it pops. For bling, we stamped a bee, colored it with black and gold markers and applied crystal Stickles on the wings. Then we assembled the card as shown, using a dimensional for the bee.

Last, we went back to the first technique, spritzing with plain water and tearing around the image. After mounting it and popping up the greeting, we added some bronze Stickles in the center. I think next time I try it this way, it would look better to also have a straight edge on top just below the tips of the petals and mounted further up in the corner.

Of course, we didn't stop at one stamp--the others had to be tried too! Check back tomorrow for the next round. Meanwhile, please leave a comment and vote for your favorite!