Sunday, April 13, 2014

HEAVY METAL

This was my first attempt at using copper on a card.  I really like the color effect you get when it is heated.  After a half hour of trying to use my heat gun, I finally gave up and headed for the kitchen.  I placed the punched piece of copper in the toaster oven, and after 6 and 1/2 minutes on "toast" it finally turned deep orange.  It looks much better here; but IRL it is all one color.  The center flower was punched from an unheated piece for contrast.

Although it didn't turn out the way I had hoped, it will still make a nice Easter card.  Meanwhile, I plan to try again tomorrow morning with my BIC candle lighter in the hopes that an open flame will do the trick.  I'll be doing it in the driveway so I don't set the house on fire!

Saturday, April 12, 2014

BACK FROM DISNEY WORLD!

Rick and I had a wonderful time in Florida soaking up the bright warm sun--it was wonderful!

Once we got home, it was back to the normal routine with Mothers Class on Wednesday.  Thankfully, I had made up the kits for class before we left.  Then it was off to Wegmans to do the grocery shopping.

UPDATE ON CHALLENGE:  Yesterday, I HAD to buy a few things at Michael's for the class next week  We are going to CASE a card posted by Bonnie Klass HERE..  (April 10 post)   I also wanted to do some mini milk cartons for Easter treats and was going to use a template I found online.  However, while looking in Michael's for the copper sheets needed for the card, we (Evelyn and I) found a pkg. of 24 milk cartons which we decided to share.  With a 50% coupon, it cost only $5.  With some additional watercolor brushes for the class, a pkg. of mini-clothes pins to hold the cartons closed and some embroidery floss and twine, I spent less than $20.  Not bad for holding down the spending since February 1st--and mainly for the class!

OH!  I ALMOST FORGOT!  I WON A STAMP SET FROM PENNY BLACK!!  It should be in the mail on Monday, and I'll show it to you then.

Meanwhile, I hope you're all enjoying some mild, sunny Spring weather this weekend!

Tuesday, April 8, 2014

PSALM AND STAMP

This combination of  a Sweet n Sassy stamp and a stamp/die set from Papertrey Ink make a great Pastor card.  The dark blue cs and striped dsp keep it masculine in spite of using a flower.  The pearls are just enough embellishment, and they pick up the dots in the dsp.

I enjoy making these pastor cards and he enjoys using them...couldn't ask for a better combination!

Monday, April 7, 2014

A LITTLE HUMOR!


This stamp was sooo me, I couldn't resist adding it to my collection!

After stamping it on a scrap of white card stock, I cut it apart so that I could put the punch line inside.  The "confusing" arrows seemed the best way to convey the thought.


TIP:  Before gluing down the arrows, I placed them on the card and took a picture of them with my Iphone so that I could remember how I had them arranged.
Hope this gives you a laugh!

Friday, April 4, 2014

HAPPY SPRING SLIDER CARD

This card is going to a friend in Florida, but is also the card we'll be making in Mothers Class next week.  The card base is from a kit I purchased at the Allentown Stamp Show from the Paper Cut booth.

For class, since we've already done a card with the tulip stamp, we'll make it an Easter card.  The kit makes it easy to assemble once it's stamped and decorated.  I'm looking forward to seeing what they come up with!

Wednesday, April 2, 2014

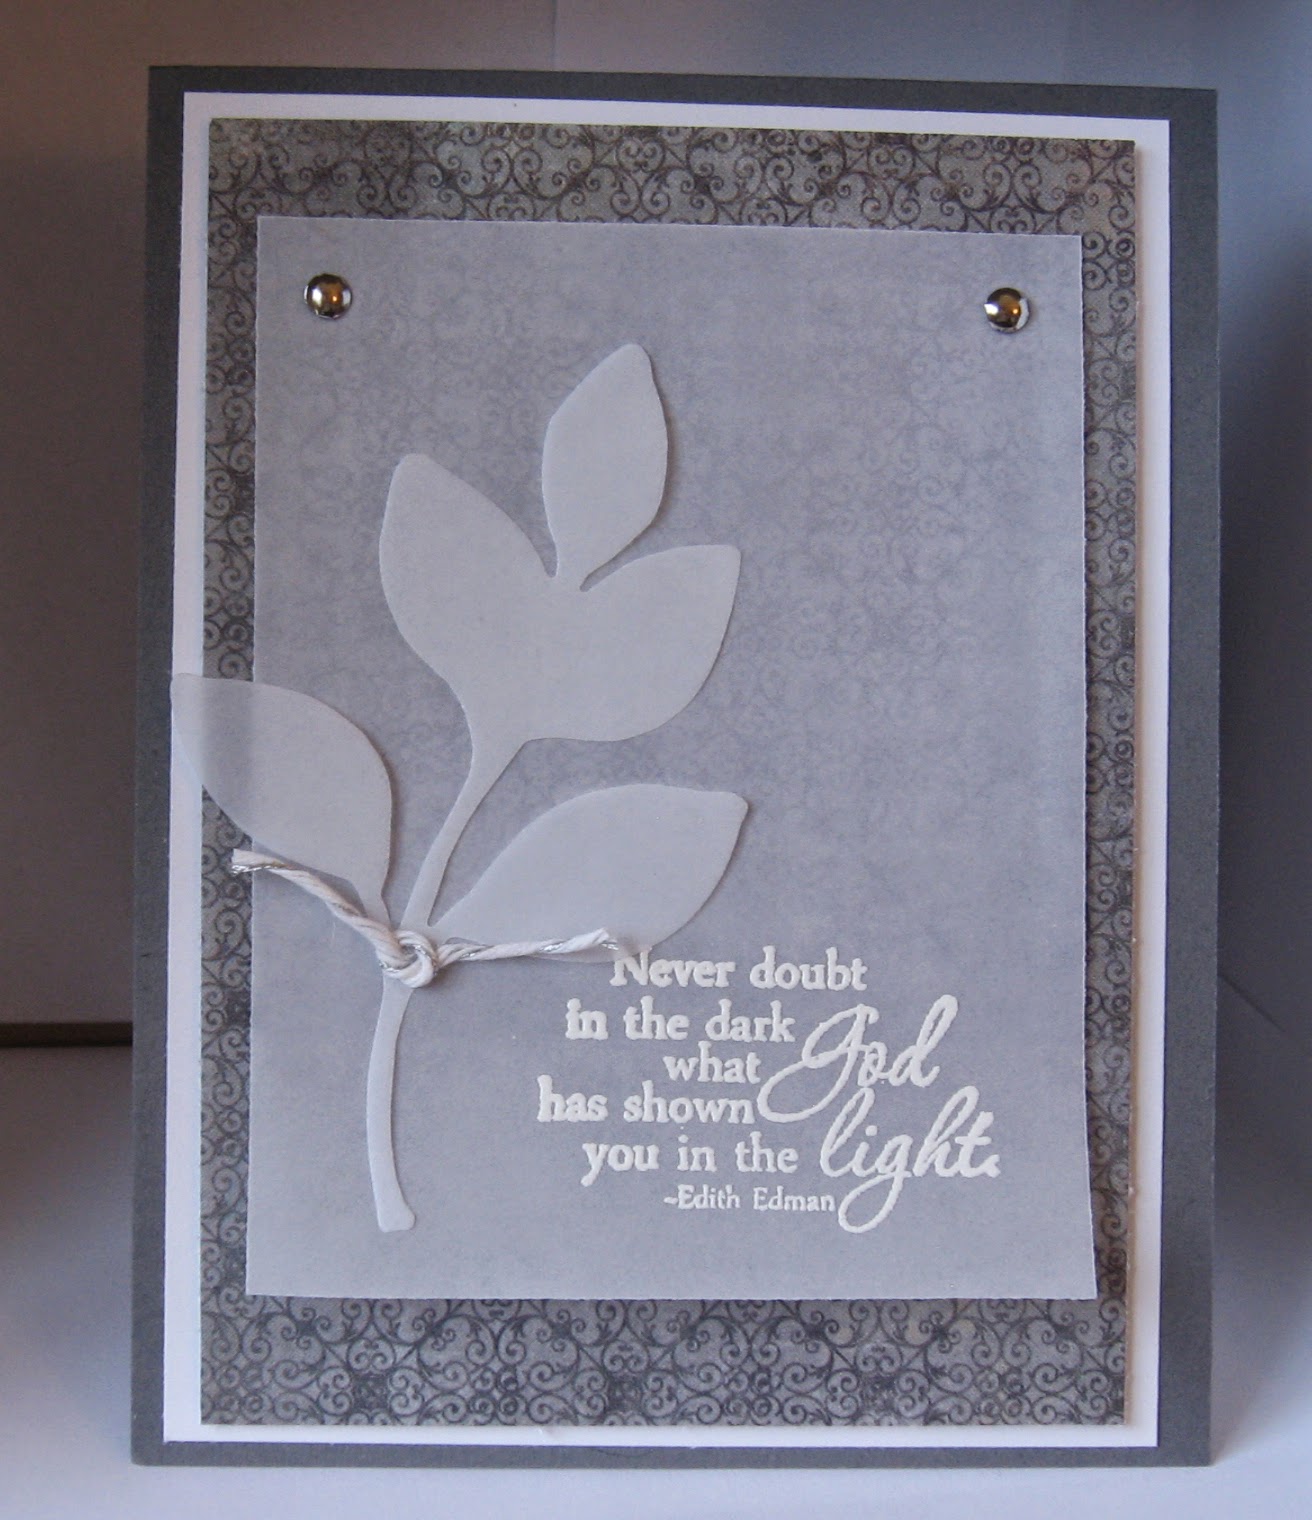
THE VELLUM TOUCH

Vellum softens a card so beautifully, I really should use it more often. 

After white embossing the sentiment, I attached the vellum to dsp and white card stock with silver brads.  Then I mounted the panel to a darker gray card front with dimensionals.  The leaf is attached with vellum tape which doesn't show through.  For embellishment, I added some white and silver bakers twine.

This is another pastor card.

Monday, March 31, 2014

IT'S BEEN AWHILE!

I've been extremely busy, but not too busy to stamp.  Just too busy to post (sorry.)

This card was done with colored pencils, and we made a bunch of these at Mothers Class last week.  It's always fun to see how everyone's cards all look so different.  The stamens were added later with black Stickles, and a Spring-time sentiment was stamped  inside.

Most of the snow around our house has melted--finally!  There's still a few clumps here and there, but we can see the grass again.  I saw one of our purple crocuses in bloom today, too.

The cats were out for a bit this afternoon while the sun was shining on the deck.  They looked soooo happy.


Thursday, March 13, 2014

MOTHERS CLASS SUCCESS!

Everyone had a fun time making their box cards in class yesterday.

Here's a tip when completing a box card:

Mount decorative items to pieces of acetate with glue dots.  Then place them (using glue dots on the bottom of the acetate strips) higher in the back and lower in the front.  This gives it a fuller look.  I even placed two items on one strip, one below the other, in the back so that the acetate wouldn't show.

Try making one of these box cards--you'll have fun decorating it!

See the March 3 post for more info.

(Don't forget to click for a larger view!)


Monday, March 10, 2014

...AND HERE ARE THE OTHER THREE

(Click to enlarge.)

FOUR CARDS FROM A 12x12 SHEET

 After watching a video on YouTube today, I was inspired to try making 4 cards from one sheet, except that I wanted them to be rectangular instead of 4 inches square.  Here's what I came up with:


After making the cuts as shown, I had four strips of 4x8" and one leftover 4" square, just as in the video. (First photo.)


However, I scored them at 4 1/2" which left the front flap 1" shorter than the bottom, making a rectangular card 4" x 4 1/2."  Then I went through my scrap drawer for a strip to match the purple cs, punched the border and glued it to the front flap.  Using a green cs scrap, I cut a 1/8" strip and glued it over the dsp.(Second photo.)  

 Before going on to the front of the card, I glued a piece of white cs to the inside.
Next, I die cut two dragonflies, one out of a lighter purple scrap and the other from a scrap of vellum.  Then I cut the wings from the purple dragonfly and mounted the body over the vellum one, mounted it with foam tape and coated the wings with Crystal Stickles.  Finally, I stamped the greeting on another green scrap and glued it to the card front--done!
(Third photo.)


Now that I've found a way to make better use of the 12x12" sheets in my stash, I'm planning to use this size for some of the smaller images I have. 


Sunday, March 9, 2014

SYMPATHY CARD

Unfortunately, this is a card we all need to keep on hand.  This one is done with sponging over a simple stamp and sentiment.

After stamping the image, I stamped just the bird portion on a scrap of blue cs and added it over that part with a glue dot.  Then I trimmed down the white panel, added the jute and rounded the corners.  The panel is attached with dimensionals.

All that is left is to write a few words of comfort on the inside.

I also made another one with a birthday sentiment inside and out.  This is so easy to make, it's a good beginner basics card also.

Friday, March 7, 2014

GOD CARES ABOUT YOU

This card made use of some scraps from another card I had just finished for our pastor.  The dsp was first glued to the bottom section of the card front.  Then the embroidery floss was added to the side.  Next, I stamped the fern and die cut it, using the same paper as the card.

Here is a TIP:  When using a die cut that has large areas uncut, such as the middle left of this fern, you can make it look cut by mounting it over the same paper it was stamped on.

After stamping the Bible verse on another piece of scrap cs, I cut it to size and sponged the edges with black ink.  Then I mounted it to the card with double stick tape.  Finally, I added the fern with foam mounting tape--done!

Thursday, March 6, 2014

STENCILING

My friend, Evelyn, gave me this stencil which I enjoyed using for this Pastor card.  After sponging the top 2/3 with blue ink and the remainder on the bottom with green, it made a simple background.

To keep it simple, I stamped the verse on a piece of the same cardstock and sponged the edges with both ink colors according to where it would be placed on the card.  After mounting with foam tape, it was done.

Thanks, Evelyn, for an easy way to make a card!

Wednesday, March 5, 2014

Inside and Out--Flowers and Butterfly

Connecting the inside of a card with the front really makes it seem more finished.  This card features some sponging of three colors on a separate panel which is then attached to a wider piece of white cs trimmed with a lacy edger punch.  After adding a thin strip of black cs on the top and bottom of the panel, I stamped the birthday greeting and attached the panel to the card front with dimensionals.

The flowers from the Morning Meadow SU hostess set are stamped, punched and mounted as shown.  For the inside, I stamped a small Hero Arts butterfly on a white cs scrap, sponged it with the same yellow inks, and fussy cut it.  I then mounted it to the inside with a glue dot on the left wing.  Lastly, pearls were added to the flower centers.

I'm enjoying this online class and looking forward to the next lesson.  Meanwhile, I'll be teaching what I learned to the Mothers Class today!

Monday, March 3, 2014

THIS IS MARCH??

Today was sunny with temps in the low 20's, and tonight will be single digits again.  However, the good news is that we did not get even ONE SNOWFLAKE yesterday after predictions of up to a foot of snow.  The storm veered just south of us by only a mile or two--amazing!

MY FIRST CARD IN A BOX...

 ...and it may be my last!  This took a few hours to make and decorate; but I'm happy with how it turned out.  I got the instructions and dimensions on YouTube*, but I had to search awhile before I found one that used an 8 1/2 x 11 sheet and had measurements in inches instead of centimeters.

Can you believe that with all the flowers and butterflies on all sides and from the middle of the box it will all fold flat and fit into a standard sized envelope--WOW!


This is going to someone VERY special.

*To access the video on YouTube, type in "card in a box" in the search box and scroll down to the one by "stampingt."  The C6 envelope (Australia) is the same as our A2 size.

NOTE:  This card turned out to be 4 1/2 x 6", so I had to use my Envelope Punch Board to make an envie for it.  So either make your envelope to fit or just trim an extra 1/2" off the top panels.

Saturday, March 1, 2014

TGIM!

THANK GOODNESS IT'S MARCH!  I have never been so glad to see the month of February over with.  Unfortunately, March is starting off with continued vigor in the snow department with 4-8 inches due Sunday into Monday, followed by record low temps.  However, it does have a reputation for going out like a lamb!

May Spring be with us all SOON!

Friday, February 28, 2014

Inside and Out--Online Classes

Did you know that you could sign up for any of the previous Hero Arts online classes?  I just started the one for Inside a card, and it's cheaper (and better) than buying a magazine!  Plus, you get videos by instructors like Jennifer McGuire, Kristina Werner and Julie Ebersole that make each technique super clear.


The first lesson was on different ways to make pop-ups on the inside, which inspired this card.  The video shows 3 ways to use a small cube on which to mount an image.  Since the card base was too dark for writing a message inside, I chose to use a white insert instead; but the idea is still the same.  As you can see, the inside is a continuation of the theme on the front.  These online classes are so helpful!

NOTE:  The online class title is "Insider."


Thursday, February 27, 2014

GREENHOUSE SOCIETY--Peony

If you love botanicals as much as I do, check out the Greenhouse Society stamp sets HERE at Technique Tuesday.  Membership entitles you to automatic monthly delivery of their beautiful stamp sets at a discount.

This was the set for January, and I used it for a shaker card with tiny green beads and purple flakes.  The greeting is also part of the set.

Enjoy!

Thursday, February 20, 2014

SIMPLE THANKYOU CARD

Our pastor most likely could use a few thank you notes, so I added this to his next batch of cards

After sponging a stencil with Hero Arts Pool ink, I ran the card front through the CB with this thanks ef.  Then I cut the oval with a Nestabilities die and set both aside.

Since I had the Morning Meadow set out, I stamped the blank scrolled  image in pool ink, then stamped the thank you in the center with a darker blue ink.  Next I fussy cut the image, mounted it on the oval with dimensionals and attached it to the card front with glue dots.  Finally, I rounded all four corners.

Easy!

FROM THE SCRAP DRAWER #36

In keeping with my self-imposed challenge to use only what I already have in my stamping tower for the rest of the year, I came upon this barely used SU Hostess set.  Actually, I have five newer Hostess sets all together.  So why would I NEED to buy more???  Well, "need" is definitely a relative term in stamping!

This was fun to make as I pulled out all the scraps.  First I inked up the French Script background stamp with Pumice Stone Distress ink, stamped off lightly and stamped it on a scrap of white cs for a faint background.  Next I stamped the floral image from Simply Soft with "full strength" pumice stone ink.  For the blossoms (this is a two-step set) I used an Eggplant Purple dye ink that I've had in my stash for at least 10 years!  It was still surprisingly juicy enough for a clear image and birthday greeting.

In my dsp collection, I found just the right color purple and green pieces to use (as shown) to highlight the flowers without overpowering them.  I colored the stems with a Mellow Moss marker and mounted the panel to a mellow moss scrap of textured cs, which I also used for the greeting.  For the final touch, I brought out the gems and embroidery floss, attaching all as shown.

Although this has been quite a challenge -- and it's only February -- I'm amazed at how much I have at my disposal, even after the last few purges and giveaways!


If you'd like to join me in my "stamping diet" challenge, see the post on January 19th. 

Monday, February 17, 2014

THREE OF A KIND--Oval Frame

 It's been awhile since I've done three of a kind for the blog, so I thought I'd have a go at it with the SU  frame ef.


This first one is stamped with Distress inks and sprayed with water for the watercolor effect.  The leaf is a stamp and matching die from Impression Obsession; and the flowers are from a SU hostess set, "Morning Meadow".  I used the coordinating punch for the flowers.  The tiny pearls go along with the raised dots around the frame.


The second card uses the poppy stamp from another SU hostess set, "Simply Sketched" and is the first time I've used it.  The greeting and flower are stamped in Versafine Smokey Gray ink to match the gray cs.  I kept this one very simple, adding just some tiny black gems and a black embroidery floss bow.

The last card uses a daisy die cut which I water colored and added Stickles to.  The greeting is stamped in Versafine Olympia Green ink.  I added a green strip and just a few embellishments to finish it off.


Are you as eager for Spring as I am????

Sunday, February 16, 2014

WATERCOLOR BIRTHDAY CARD

After watching Julie Ebersol's video, I just had to give her design a try.  For the background, I applied Tumbled Glass, Broken China, Peeled Paint and Wild Honey Distress inks onto an acrylic block.  Then I applied the colors on a heavy cardstock panel with my aqua painter.

Next, I used a tiny flower peg stamp with the same blue inks to continue the watercolor look.  For the birthday message, I stamped the typewriter from the SU "You're My Type" set with Versafine Smokey Gray ink.

To finish, I attached the panel to an olive green textured cs with double stick tape and mounted it to the card front with dimensionals.  For the final embellishment, I added three small sequins.  Done!

Thursday, February 13, 2014

Valentine Wildflowers

This is one of  the Valentines I sent out this year.  After taking the internet class on stenciling last month, I made the heart stencil using a punch and a piece of cardstock.  Then I sponged red ink over it onto the white panel and stamped the flowers and verse over it.

Before adding color to the flowers with colored pencils, I trimmed the panel to size, rounded the corners and mounted it to the blue cs with TomBow Mono glue.  The smaller flower was added from my collection to give it a little sparkle, and  yellow Stickles was used for the centers of the other two blossoms.   While waiting for the Stickles to dry, I ran the card base and embossing folder through my Cuttlebug and stamped the sentiment on the inside.

Happy Valentine's Day everyone!

Secret Message Thank You


Here we are in the midst of yet another huge snow storm--a good time to stamp!

This secret message card is for someone who sent me a lovely Valentine card.  The base card is kraft, but the front panels are a light green.  The flowers are colored to look more like poppies than daisies.
 When the card is first opened, you see the back of the front square, which is why I used red  for the flowers.  The white boxes are for the letter I'm writing.  Although it's hard to see here, there are snow flakes stamped in white on the kraft rectangles.
Once opened up to reveal the secret message, there are flowers stamped with peg stamps on the kraft pieces.  The white rectangles are used for the words of encouragement hand written in green.

For instruction on how to open the card (or make it) just go to Utube or Google and type in secret message card.  Lots of them will come up!

Opening the card is so simple once you know the trick.  Enjoy!

(Click on photos to enlarge.)

Wednesday, February 12, 2014

Special Card for a Special Friend

If I ever get out of my driveway to go to the Post Office, I'll be mailing this card to someone special who sent me a batch of these falling heart panels.  Somehow, I opened the card when it came (I can't even remember when) and set it aside.  I guess I got distracted after that and the envelope got mixed in with other papers until today.  What a happy discovery!

Thank you, Kim.  I hope you like the card and know that I truly appreciate your thoughtfulness.

Friday, February 7, 2014

Spinner Valentine Card

Interactive cards are always such fun!  To "set" the spinner before mailing, just blow on one side of the circle, then stop it with your finger and put it in the envelope.  When the recipient opens the card, the circle will spin automatically.

Meanwhile, you can play with it for awhile before sending it... *wink*  Watch out--it's addictive!


(See previous post for a birthday version of the same design.)

Thursday, February 6, 2014

Fabulous Floret ala Brandy Cox


 If you haven't discovered Brandy Cox's videos on Utube, you are really missing out!  This card is patterned after her gorgeous butterfly card, with some variations of my own.  First of all, mine is a side fold; hers is a top fold.  One advantage of the side fold is that you don't have to remember to place the inside image upside down so that it's right side up when you open the card.  I wish I could say I brilliantly thought that up on purpose, but it was because I forgot to make it a top fold.  However, from the front they both look similar in design.

Next, in order to have some contrast between the floral circle and the white cs on the inside, I added the green circle that was die cut from the front so that it would be directly behind the flower opening.  Once I did that, the flower just popped!

For instructions and video, just go to Utube, type in Brandy Cox and look for a yellow butterfly card..  Then sit back and enjoy!

Wednesday, February 5, 2014

CASEing the iPad #10

With all the snow and ice we've been getting lately, is it any wonder I keep choosing green for my cards???

This one was inspired by Splendiferous Creations HERE.  Lisa Somerville does beautiful work!

Using a stencil buried deep in my stash no longer, I sponged two shades of green and one yellow of Distress Inks, blending the colors as I worked my way down the card.  The message is white embossed on a scrap of tinted vellum (green, of course!)  The square at the top of the tag is silver metallic, although it looks gray here.  After decorating the tag, I mounted it to the stenciled piece with a craft glue dot at the top and then mounted the panel to the card with dimensionals.

I'm looking forward to seeing some green grass again SOON!

CASEing the iPad #9

I haven't CASEd (CopyAfterSomeoneElse) in quite awhile, but since I'm stuck in my house during the latest round of winter storms...

This is one of those cards that looks better IRL than here.  (My card isn't quite so yellow.)  Although mine turned out quite a bit different than the one I copied, I still like it.  If you'd like to give it a try yourself, check out the Cardography blog HERE.

Thanks Therese for the inspiration!

Sunday, February 2, 2014

HEARTS AND FLOWERS

Love those scraps!  They all happened to match beautifully (the hearts panel isn't as red as it looks here.)  I ran the punched white heart through a floral Cuttlebug embossing folder and added another white flower on top.  The gem under the "you" is a heart shaped one, and the pink heart in the "O" is also popped up with a dimensional.

Next stop:  Super Bowl (on TV!)


Tuesday, January 28, 2014

FOR OPENING DAY AT MOTHERS CLASS

We usually wait until the first week in February to resume our Mothers Class stamping, but we're all suffering from stamping withdrawal.  Besides, January has 5 Wednesdays this year, so that's our excuse for not waiting until February--YAY!

This is the first card we'll make in class.  I just learned this chevron technique, so it should be fun.  


Monday, January 27, 2014

CARDINAL CARD

With the weather we've been having, I'm stamping up a storm...literally!

This is an oldie but goodie from SU which I stamped in Versafine black and watercolored.  Although it was a bit time consuming, it was an easy one to do.  All I added was a scrap of black cs for the border and a tiny black gem for the eye.

Enjoy!

Sunday, January 26, 2014

BIRD ADVICE


This little birdie surely has it right!  He's not worried about a thing...

Saturday, January 25, 2014

ENVELOPE CARD

In keeping with my own challenge to use only what I already have in the tower to the end of this year, I rediscovered this stamp and used it today.

After stamping it in black ink on dsp, I made slits where the opening would be to insert the tag as shown.  Then I mounted it on a scrap of  textured vanilla cs and cut around it to make the border.

The background is stamped in Versamark Frost with both large and small swirl stamps.  While it dried, I placed foam mounting tape on the back of the envelope and added three tiny black gems at the intersection of the lines.  Once the Versamark dried, I mounted the envelope with its message inserted.

So far, this challenge has been easy.  I've been finding lots of stamps I'd forgotten about and plan to use them soon.  The real challenge will be in the Fall when I start running out of adhesives and cardstock!

Friday, January 24, 2014

I WON! I WON!

Hero Arts Online Classes on Stenciling drew winners from comments left on their blogs, and I was one of them--YAY!  Classes started today, so I wasted no time in putting the new information to good use on this card.

Since I don't have any stencils, I made one of my own from a Martha Stewart stars punch and a scrap piece of cardstock.  After sponging the stars onto the white panel, I added the "Birthday" die cut, the "wishes" and some extra stars from a small punch.  The embossed zig-zag line on the bottom is from a Sizzix border ef.  Now that it's mounted on a card front, I'm entering it in the Sweet and Sassy challenge HERE!

I'm on a roll!

Thursday, January 23, 2014

HUMOROUS CARD CHALLENGE #2

Inside reads:  "...and it was DELICIOUS!"

Since I'm not buying new stamps this year (we'll see how that goes...) I typed up my own.  First I glued the verse to a scrap of cs and die cut it.  Then I mounted it on the card with dimensionals.  I did the same thing with the "punch line" inside.

For other humorous cards, you can visit the Simon Wednesday Challenge Blog HERE.


Wednesday, January 22, 2014

STAMPING UP A STORM...literally!

As you can see from my last few posts, I've been at it full time since the storm dumped all the snow on the East Coast!  We just got plowed out at 3 pm today, and the sun is shining brightly through the tower windows on the west side of the house.  Nice and toasty in here!

Be sure to scroll down for the latest posts...

HUMOROUS CARD CHALLENGE


For this stamp set, I chose to make a tri-fold card.  I cut a 12 x 12" sheet of cs at 5 1/2" and scored it at 4" and 8" so that it would fit in a standard size envelope.

The birdie image was stamped on watercolor paper with Versafine Smokey Gray and painted with Distress Inks and my Niji brush.  I stamped another bird, colored it, cut it out, and attached it with glue dots over the first one to make it pop.  After mounting the image to the black square with foam tape, I glued it to the card front and added the saying below.

For the inside flap, I stamped the cat on a scrap of cs and used colored pencils for the image.  Then I simply glued it to the flap.

This card will be entered HERE in the Simon Says Stamp challenge on
 their blog where I hope to win the $50 gift certificate!


PS:  After posting the card, I realized I didn't need to make it a tri-fold; so I cut it apart and remounted two of the panels on Very Vanilla cs.  That leaves me with the extra panel for the front of another card later on.

CASCADE VALENTINE

The "dreaded pink" rises again!  This time, at technique class last week where we learned how to make the cascade card...not that I would remember ;)

Basically, it's two angled pieces joined in the middle with slits in the folds so that one piece slides down over the other.  Got that?

For a simpler version, however, you can look up "Concertina Card" on Splitcoast Stampers under tutorials.  Beate's video is very easy to follow!

Tuesday, January 21, 2014

CORRIE TEN BOOM QUOTE

I really like how this one turned out!  The glitter in the dsp gives it some sparkle, while the black keeps it masculine.

The verse is another one from a Sweet and Sassy set; and Corrie Ten Boom said it well!