
Saturday, October 8, 2016
Wednesday, September 28, 2016
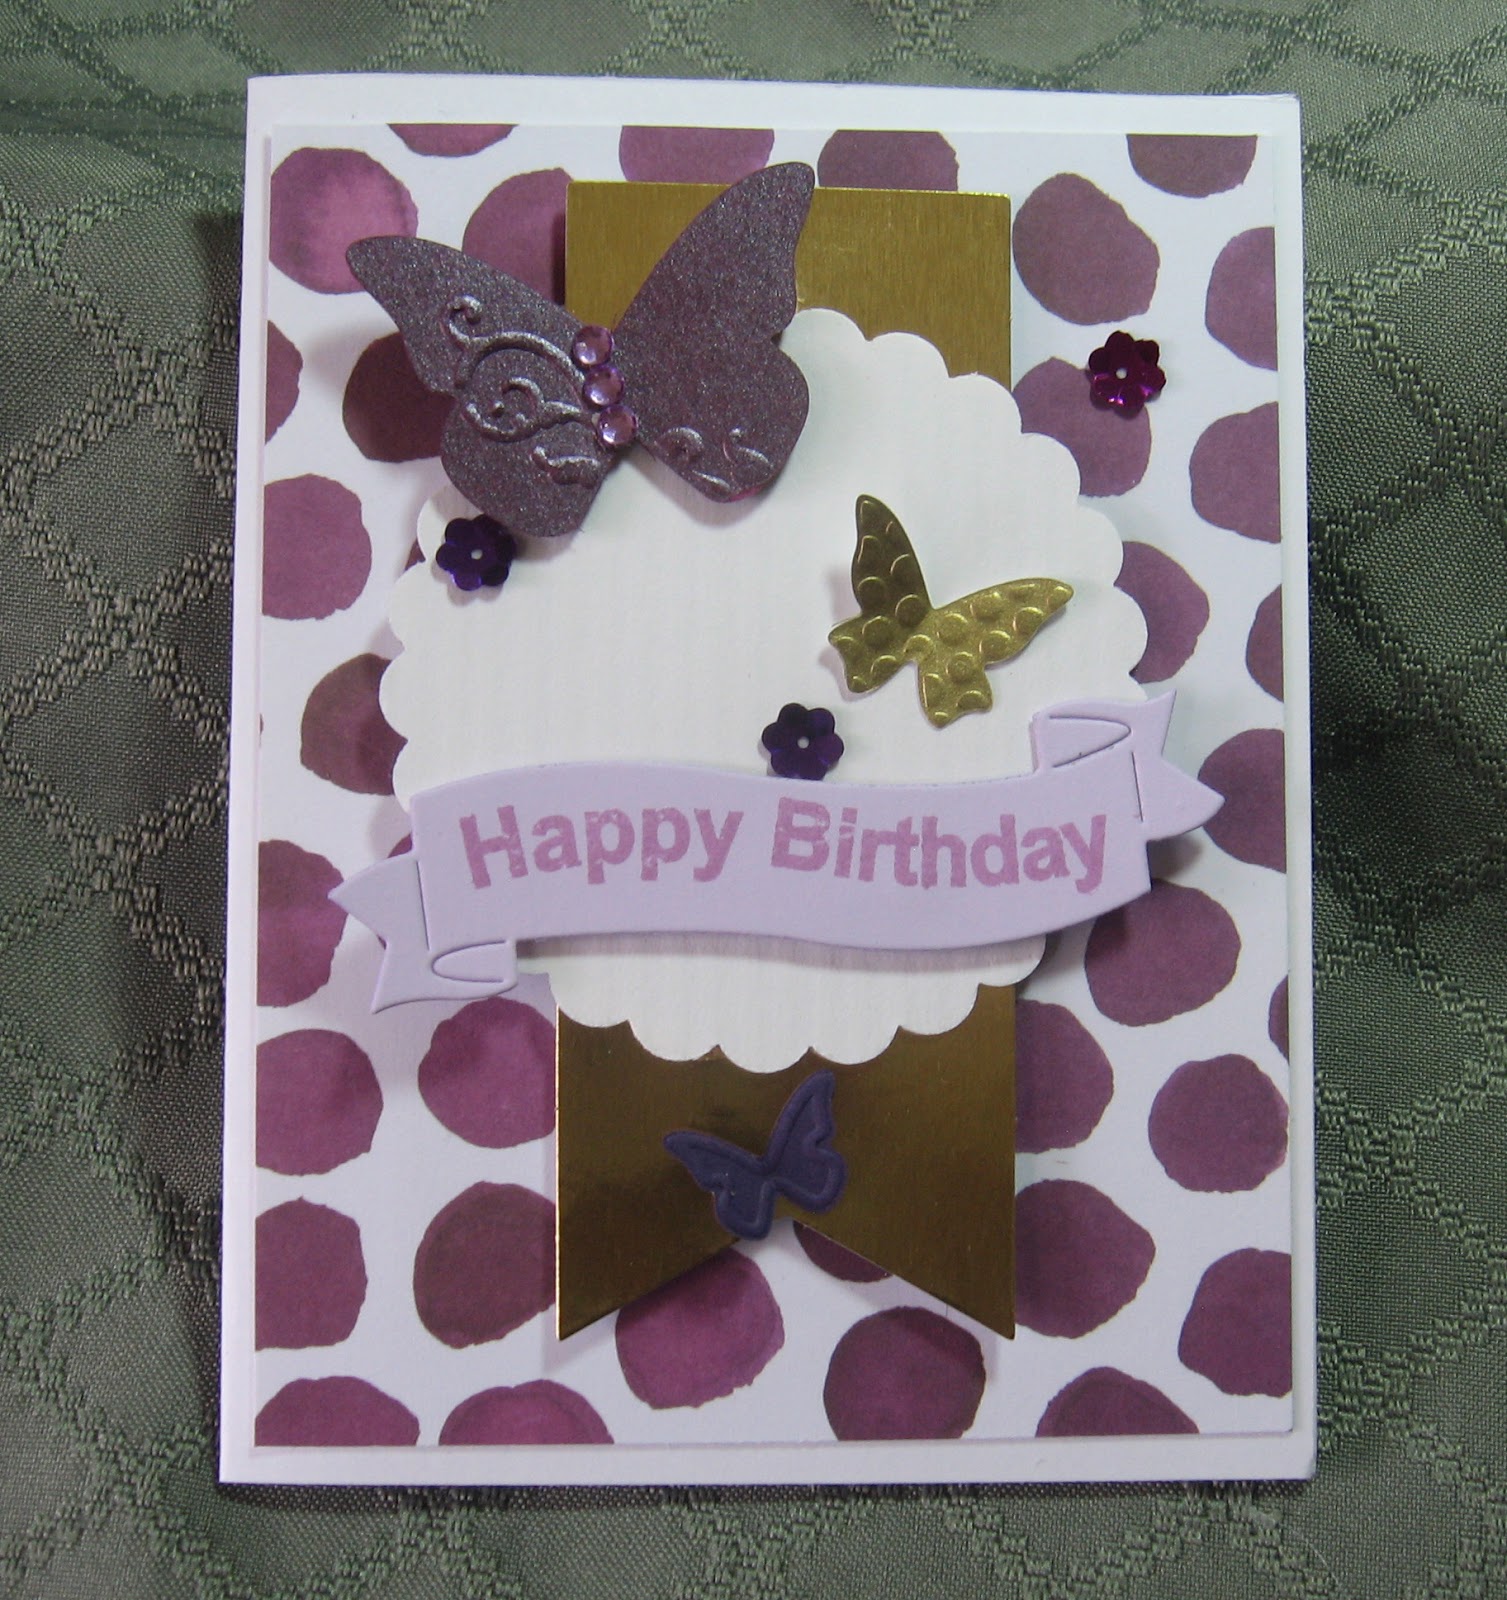
PAPER PLAYERS SKETCH CHALLENGE -- #314

Tuesday, September 20, 2016
TWO MORE PASTOR CARDS

They also had a Thanksgiving stamp set which I plan to try later on this week--so stay tuned!
Monday, September 19, 2016
SILVER STAMPERS
I've mentioned Silver Stampers several times on this blog, but I want to mention them again. I've just received over 30 birthday cards this past week--today is the day!--and it has been so uplifting. If you are over 50 and love to send (and receive) cards, then you would surely enjoy this wonderful group of stampers. The annual dues ($12) cover the cost of maintaining and mailing the annual directory and birthday list.
Membership gives you the opportunity to make some new friends by mail, or sometimes in person. You can correspond with one or two on the list or 50 or more--it's up to you. There are over 100 members from all over the country. I keep in touch with about 10 or 12 on a regular basis, send birthday and Christmas cards to about 50 and receive as many back. Some write or type long newsletters, some just sign the card and others enclose a separate note so their card can be re-used. You could start out by picking one name from each month of the birthday list, which would give you just one a month.
If you think this might be something you'd enjoy, you can contact the current coordinator, Gretchen King. Her email address is gk1146@softcom.net. (All levels of stamping are welcome, beginners to advanced.) Just tell her Doris sent you!
Thursday, September 15, 2016
DE-CLUTTERING TIME AGAIN!
In preparation for the Fall de-cluttering class I'm leading, I've been getting a head start. After all, I can't teach what I don't do! Starting with the Stamping Tower, I took out 4 bags of giveaways and 2 bags of garbage.
It was so inspiring to get that done, that the next place I did was the laundry room. There were 4 overhead cabinets filled with "stuff" and 3 added floor cabinets of more stuff. That purge yielded 6 -- yes 6!-- large garbage bags of stuff, including some items on top of the wall cabinets that were there when we moved in 26 years ago! I found things that were duplicates and triplicates because they had been pushed to the back and forgotten. Thankfully, we finally found someone who is now repainting the room for us, which involved removal of foil wallpaper, installing new faucets and adding a shutoff valve in the basement just for the laundry room. He's also putting in a new floor. When the room is done, it will be minus 2 of the the 3 extra cabinets so that it stays neater.
Finally, last week I cleaned out the linen closet and gave away another 6 bags of extra sheets and assorted table cloths, plus one giant bag of items for garbage pickup. I kept 2 of each size tablecloth and 2 sets of sheets for each bed.
Here's a tip from my daughter who is on her way to becoming a certified home organizer: Store bed linens in the closet or a drawer of the room where they will be used instead of the linen closet. Same with guest room towels. Other towels can be stored in the bathroom where they are used either in a basket or a wall rack like those found in hotel rooms. The saved linen closet space can then be used for bulky seasonal items.
If you'd like to follow along on the weekly challenges of my class, the first challenge (next Tuesday) will be to de-clutter paperwork, magazines, catalogs etc. and establish a file drawer (or two.)
THREE OF A KIND--Baskets of Wishes

For today's post, I played with my new SU set which was delivered here yesterday. The first card I made is for an October birthday. I stamped the basket in Walnut Stain Distress ink. The flowers were stamped in light gray and colored with glitter pens. The jute bow is the only embellishment.

The second card will be for either a late October or early November birthday. I water-colored the basket and colored the squashes with markers. I plan to add some sequins later.

Finally, I really went to town on the last one. I white embossed the basket and filled in the spaces with a white gel pen so that it would look like a ceramic basket. I used glitter gel pens for the succulents so they'd stand out from the dark green background. The dsp I chose was a scrap that also had a cutout on the top left corner; but since it was the only piece left, I covered it up with the birthday banner from a Frantic Stamper set. Enjoy!
Monday, September 5, 2016
ANOTHER GREAT SAVE

After dusting the word with anti-static powder, I went over the whole word with a Versamark marker. Then I sprinkled it with gold ep and repeated the process 3 times. Next, I gold embossed the "birthday" label and used glue dots to hold it in place.
To fill the huge expanse of nothingness above the words, I gold embossed the butterfly which was in my stash and added the black gems. It seems to have filled the space perfectly.
...and to think this card was headed for the trash (almost!)
Sunday, September 4, 2016
HUMOROUS CARD FOR A FRIEND

I used my computer to print the punchline inside which reads, :"The trick is getting them all on the cake.!" I signed the back of the card also with "A one-hour card made by..."
Of course, I also enclosed a gift card. After all, birthdays are serious business.
Thursday, September 1, 2016
SPLITS--Saying Hello

This SPLIT set is for sympathy cards; but thankfully I don't need one right now, so I used the greeting from another set.
This will be used to send someone a quick note. The dsp was cut short, so I just cut down the size of the card and went with it. Since this is the least ornate of the SPLITS, it work great.

Wednesday, August 31, 2016
THREE OF A KIND--SPLITS

These three each use a different set and are cut to three different sizes. It was fun making these!
My favorite is the sympathy card, but it's sad that I needed it this week.
Tuesday, August 30, 2016
SPLITS--Thanksgiving Card

I added the jute and sequins for some embellishment and rounded the bottom right corner.
I think I like this SPLIT set the most!
SPLITS from Paper Trey Ink

This one is called "Just a Note," but there are lots of other stamps that will fit in the space provided. The matching dies make them easy to pop up for dimension. This one is mounted offset so that the dsp underneath would show. I had sequins that matched the colors in the dsp, so I added them for embellishment.
Monday, August 29, 2016
BOTANICAL BIRTHDAY

The greeting and scalloped punch are from SU!.
It seems the Botanical set has endless uses...
Sunday, August 28, 2016
SOFTER PASTOR CARD

The butterfly is die cut from a ;iece of dsp which matches the gray and yellow used on the card base and panel. The Bible verse was done in an airy font, which complements the butterfly.
Friday, August 26, 2016
ANOTHER FUSE TOOL CARD

In addition to the shaker, I also put the bird on an action wobble for added interest!
Thursday, August 25, 2016
BIRDSEED CARD

After using some brown ink on the beak, feet and tail of the bird, I popped him up on the card. This will make a nice pastor card.
The message is from the SU! "Trust God" set, which I enjoy using a lot.
Wednesday, August 24, 2016
FUSE TOOL

We each made this same card, filling a pouch with assorted sequins, beads and flowers. The Fuse Tool sure made it a lot easier to make a shaker card. Although it doesn't shake as freely as it would with two layers of foam, it also keeps the contents from falling to the bottom. I guess that's what you call a trade off.
Tuesday, August 23, 2016
LITTLE TREE, BIG WISH

This embossing folder oval has a tree at the bottom which can either be used for Christmas or covered over for a different card anytime during the year. It's been in my stash for a long time, so I'm ready to let it go, however. I think I'll give it to one of my "J" friends!
Tuesday, August 16, 2016
IN MY THOUGHTS

If you look closely, you can see that one of the flower layers was actually die cut from the same plaid dsp. It sure is worth it to hang on to large scraps!
Monday, August 15, 2016
HYDRANGEA Z-FOLD

It's been so hot here lately, that spending time stamping in the tower has been even more of a pleasure. This set is really fun to play with!
Sunday, August 14, 2016
Z-FOLD WORDS OF ENCOURAGEMENT

However, it doesn't take a lot of words to cheer or encourage someone. Just sending a card you make yourself says even more than the words in the card. Having been on the receiving end of cards from friends who let me know they were thinking of me during a difficult time was such a blessing.
Pass it on!
WOODGRAIN EXPERIMENT

I've been admiring the wood backgrounds that look like boards or barn siding, so I came up with my own.
Using the woodgrain background stamp I already have, I stamped it on white with Pumice Stone Distress Ink. I cut the panel to 4 x 5 1/4" and used my ScorPal to make "boards" 1" wide. After making the grooves, I used a ruler and gray marker to color them. Then I drew lines across at varying intervals.
This will make a nice masculine card for our pastor to use.
Saturday, August 13, 2016
GUESS WHAT ARRIVED IN THE MAIL TODAY!

This is the first (of many cards!) that I'll make with this set. After posting this, I removed the leaf because I thought it looked a little too big. I'll make another and glue it on the inside.
Stay tuned for more creations with this beautiful set.
Sunday, August 7, 2016
RECYCLED CHRISTMAS CARD

This card is now in the box with all the Christmas cards I've made so far.
I will add this post to the Christmas Challenge blog HERE
Friday, August 5, 2016
EASIEST CARD EVER

All it took was a piece of designer paper, the SU small butterfly punch and a die...oh, and about 10 minutes.
Thursday, August 4, 2016
CHRISTMAS CARD CHALLENGE

Since I send out over 100 Christmas cards, they have to be simple to mass produce. This one is done with an Our Daily Bread Designs die. To make sure all the little bits of paper can be removed easily, I use dryer sheets in the cutting process.
After die cutting the verse, I glued it to the card front (over some dsp) and added 3 tiny rhinestones for some extra shine.
This is my first entry at the Christmas Card Challenges blog, and I enjoy seeing what others are doing.
PAPER PLAYERS #306

This week's challenge was a Tic-Tac-Toe choice. I opted for the diagonal "Enamel Dots, Patterned Paper, Die Cut." Since I don't have a small butterfly die, I used my SU punch instead.
The butterfly was punched from an empty cardboard tissue box. They have such nice designs now that I hate to just throw them away!
CAS stamping + Spraying + Choice

It took me awhile to find the sprays in my stamping tower, but this card went fast after that!
I've been using dies for so long, it was a pleasure to actually stamp an image. The fern is from a Papertrey Ink set, and the greeting is from MFT Spring Tulips. My "choice" was in adding punched butterflies.
After spritzing the background paper with Mr. Huey's Opaque White, I set it aside to dry while I gathered my stamps and punched the b'flies. Next, I stamped the fern with Versafine Olympia Green twice without re-inking, then the greeting with Versafine black. After adding the b'flies and "dressing" them with pearls, I mounted the finished panel on a white card base.
WHERE DID JULY GO?

Is it just me, or is this summer going fast??
Now that July is over (and we're that much closer to winter) I've remade the July calendar page into a new card. It will make a nice encouragement card for someone.
Saturday, July 30, 2016
SOMETHING TO PONDER
We'll be on our way home tomorrow after a week of fun in the sun. Right now it's pouring and thundering with lightning flashing all around us. Thankfully, we already packed the car except for one bag we need in the morning; so we didn't have to deal with the heavy rain. It was a great week!
Here's a question to ponder: If snowflakes are winter's butterflies, does that mean butterflies are summer's snowflakes? Hmmm...
Here's a question to ponder: If snowflakes are winter's butterflies, does that mean butterflies are summer's snowflakes? Hmmm...
Tuesday, July 26, 2016
JUST A TIP FROM OBX TODAY!
Having a wonderful, relaxing vacation this week at "our" beach house. No card for today, but here are two tips for making spinner cards:
1. I use dental floss or fishing line for the spinner so that it doesn't stretch.
2. To reset the spinner, instead of twirling it with my fingers, I just blow on one side of the spinner and close the card.
Hope you're staying cool today wherever you are! Remember, when it gets really hot, it beats chipping ice off the windshield!
Monday, July 18, 2016
COOL CARD FOR A HOT FRIEND

Combining two seasons into one, I embellished the quilted snowflake with a foil butterfly from my scrap drawer.
...and I thought today's temp of 93 here in NJ was hot!
Sunday, July 17, 2016
PAPER PLAYERS--Water Color

This one is called "Peonies and Butterflies." After this post, I will be adding some shimmer water color paint to the blossom.
The pages in this book have made water coloring so much easier and fun for me!
Saturday, July 16, 2016
SUCCESS AT LAST!

After reading her tips and admiring the flowers and foliage on each page, I got out my water brush and three types of paints: watercolor crayons, Peerless paints, and a set of pearlized paints. I colored three flowers and the foliage on the first page of anemones just to see how they each differed. I started with the crayon paints, which is what you see on this card and also turned out to be the best, in my opinion.

Starting at the top, I painted the flower and leaves with the pearlized paints. Although my least favorite, these paints work nicely over other paints to give them a sheer pearly finish. They also did not blend well.
Next, in the left bottom corner, is the Peerless sample. This also did not blend well, which was surprising. It could be the paper, a cheap brush or just my lack of experience.
However, the WC crayons (Lyra) blended nicely and was the most realistic of all three flowers.
As for the card itself, I had a lot of fun putting it together. Using the WC crayons, I first painted the blossom, berries and leaves, cutting it down to a strip for the front of the card. I mounted it on a piece of green cs, using the same cs for the "hello" die cut. I found the butterfly in my stash, and it went perfectly with the orange flower center. I gave it some shine with my Wink of Stella. Before assembling the completed strip, I ran the card through the Big Shot with a floral ef to give it some texture.
Not wanting to waste anything left over, I made a second card with the scraps. The bird was die cut from a scrap of marbled metallic paper and backed with the same gray paper as the greeting.
I can see that I'll be using this beautiful water coloring book a lot!

Tuesday, July 5, 2016
POST SURGERY GET WELL

At the end of the list, I wrote ""Enjoy your VACovery!"
One of the things I love about making and sending handmade cards is that you can make them say whatever is appropriate to the person. I've often said that sending cards with personal messages inside is truly a ministry and means a lot to those who receive them. It's a wonderful way to brighten someone's day!
Monday, July 4, 2016
HAPPY BIRTHDAY AMERICA!
What a great privilege it is to live in this great country of ours! I thank God every day for my family and friends, my home, the beauty that surrounds us and the freedom we all enjoy every day. In spite of enemies who would tear us down, this is still the only place I'd want to be. I'm especially grateful to have my children and grandchildren nearby.
Happy Fourth of July to all my blogging friends!
Happy Fourth of July to all my blogging friends!
Sunday, July 3, 2016
GOODBYE JUNE, HELLO JULY BIRTHDAY
After attaching the dsp, along with the gold foil banner, I added the scalloped circle, butterflies and birthday banner. A few matching sequins and some gems for the large butterfly, and the card was done.
I'm so glad these calendar pages can be redone to serve another purpose.
Tuesday, June 28, 2016
VERTICAL BIRTHDAY

After stamping the potted tree in a soft green, I used plain ol' ordinary markers to color over it. I tapped on the green, colored the trunk and pot, then added the shadow. After mounting the image to a green rectangle, I popped it on the card front with dimensionals.
For the greeting, I made a little banner from scrap and attached it at the top. For embellishment, I added several tiny clear gems on the tree.
Sunday, June 26, 2016
PAPER PLAYERS 301

The stamp is from an old set I have in my stash from my days as a demonstrator for The Angel Company. Sadly, the company is gone, so I treasure my TAC stamp sets. This one is so me...
Saturday, June 25, 2016
FEMININE CARD

First, I die cut some flowers from a leftover piece of watercolor paper that I used to experiment with Color Burst powders (purple). For contrast, I also die cut some of the smaller flowers from some dsp.
After choosing the dsp for the card front and a coordinating piece of pre-printed vellum, I mounted them as shown. Next I assembled the flowers and mounted them along the edge of the vellum. The greeting, stamped on plain white cs cut down to form a banner along the side, is from the SU! set, "Vertical Greetings." For embellishment, I used yellow gems for the flowers and a purple gem for the top of the banner.
Wednesday, June 22, 2016
LIVE, LOVE, GROW

The look was finally achieved by cutting the window square from a square frame die I got from My Favorite Things. After die cutting the window, I attached a square piece of acetate to the back with Score tape. After gluing the terrarium to the card front, I adhered the frame to the card over the terrarium. Then I cut the card down to a square and added the bow to fnish it off.
I also used this stamp set for a birthday card. Instead of the plants, I placed a birthday cake slice inside!
Tuesday, June 21, 2016
YOU CAN'T BUY HAPPINESS!

After gluing the dsp to the card front, I simply added the saying and a cupcake from another set (can't remember which one or where it is.) Then I added the little flower and gem. Finally, I used lilac embroidery floss on the left.
Very simple card to make.
Monday, June 20, 2016
GOODBYE MAY!

After removing the calendar, I stamped "Birthday" on a scrap of white cs, glued it over the word "May" and re-mounted the wreath over the spot where the calendar was. I sponged some sky and added a die cut "happy" above the wreath. Then I mounted the panel on the front of a white card base.
I love that this perpetual calendar from the December Paper Pumpkin has done double duty as each month ends!
Saturday, June 18, 2016
MUSEUM "REPORT"
Our inspirational trip to the NY Met. Museum of Art was a lot of fun. Evelyn, Carolyn and I left my house around 9 am (after rush hour traffic was over) and arrived at the museum around 10:45. After entering the museum, we first took a guided tour. Since this was Carolyn's first visit (gasp!) I thought this would be a good way to get oriented. I reminded her that the museum has artwork everywhere you look, but you have to ignore the displays you're walking through and focus on where you want to go...very hard to do!
The tour was of art in the Byzantine era and lasted one hour. Our guide was very knowledgeable of the history as well as the art pieces she took us to. She started with a map of the Mediterranean Ring (North Africa, Spain, Italy, Greece and the Middle East as it was in the time of Constantine.) The arts included sculpture, architecture, silver and gold artifacts, and even a stained glass window. I suspect she had a Phd. but spoke on our level, answering questions from our small group as we went along. The only downside of the hour was that the marble floors were very hard on my back but it was well worth it.
After lunch in the cafeteria (really a self-serve restaurant the food is so good) we went back upstairs and headed for the Arms and Armor hall. Carolyn was amazed at the deailed artwork on all the pieces on display, especially those for the horses. After all, if your horse goes down in battle, you're going down with it!
Next was a special exhibit on fashion which was unexpectedly amazing. The centerpiece was a wedding gown of the house of Chanel. There were gold sequins and gems on a long train that sparkled under the bright lights and reflected in a kaleidescope on the domed ceiling. The other exhibits were from several other designers, the most fascinating of which was a cocktail dress made of straws. They were all stunning!
Next, I took Carolyn and Evelyn to see one of my favorite paintings, a huge masterpiece of Joan of Arc as a young peasant girl.. From there, we went to see their collection of impressionist paintings. After a stop to browse the gift shop, we headed for home, a bit tired from all the walking but happy to have done it.
Praise God for getting us home safely in heavy traffic going 70 mph or more!
HOSTESS THANK-YOU NOTES

I wanted to make something reflective of the rose garden setting, and the Painted Petals set from SU! was ideal. The leaves are from a Penny Black set, Petal Power. The tiny flowers and dots were from my peg stamp drawer.
After stamping the leaves onto a die cut stitched rectangle, I started adding the flowers. Beginning with the largest, I stamped the roses in Watermelon Wonder to match the card base. Then I added the yellow clusters, the purple blooms and the blue dots.
The sentiment was stamped on a piece of white scrap, sponged with Watermelon Wonder ink and mounted with a dimensional. Inside, there is a white panel with a flower stamped in the left bottom corner. To finish it off, I also decorated the envelopes.
These were fun to make and I had all six done in record time!
GRADUATION THANK-YOU NOTES

When asked to make 16 thank-you notes for our grandson to use, I had to come up with something simple. This wasn't as easy as it looks, but I've got a dozen made. The last four will be a little different, I think. What made this so time consuming was pasting the little pieces in the a, y and o of the letters that were die cut.
One thing that helped was Press and Seal wrap from my kitchen drawer. Before running the blue panels through the Big Shot, I lined up all the letters on top of the wrap, added the "you" die and pressed the letters onto each blue panel to cut the word and letters all at once. The letters stayed in place for all 14 cards. (A BIG thank you to Jennifer McGuire's husband who invented Press and Seal!)
The card is done in school colors, of course, with the panel mounted on the gold card base so that he would be able to easily write on the inside.
Thursday, June 16, 2016
OFF TO THE CITY TODAY!
One day last week my friend Carolyn mentioned that she'd never been to the Metropolitan Museum of Art in NYC, which is only an hour away. Since that is my favorite museum, we decided to make the trip and chose this date. So today, that's where I will be with Carolyn and Evelyn. It's a rainy day today, which will not affect us at all since the museum has a parking garage attached and a cafeteria with great foods. We'll start by going on a guided tour of museum highlights, then have lunch and then explore a few exhibits before leaving around 3:00 ahead of rush hour traffic.
Check back tomorrow for an update!
BTW, it's been awhile since my last post because I've been busy making 50 cards for our pastor to use as follow-ups after VBS. I also made 5 thank-you notes with matching envelopes for my friend, Gail, who had a garden tea last weekend. I'm now finishing up on a set of thank-yous for our grandson to use for his graduation gifts. Once I'm done, I plan to post them--hopefully, tomorrow.
Friday, June 10, 2016
HOW DID THAT HAPPEN???

To celebrate, I made this card with his school colors. Using a new set of number dies, star dies and "Happy Graduation" stamps all from My Favorite Things, I came up with this folio card.
Shown here are the front and inside of the card.
If you need a card for graduation, this stamp set has lots of great sayings, so check it out!

Monday, June 6, 2016
IN FRIENDSHIP

The banner is from a set of two that I got at Frantic Stamper, which also includes a number of pre-curved stamps. The die for this one comes out flat as shown, while the other one has embossed lines to fold the tails under for a popped up banner.
As you can see, I'm still have fun with this set of dies!
Friday, June 3, 2016
JUST BECAUSE

The bottoms two thirds of the card front is covered with a piece of vellum for its softening effect. The flower petals are sponged to give them some dimension, and the twine is added for texture.
The greeting is from the SU! set, Tin of Cards.
Thursday, June 2, 2016
ANOTHER BOTANICAL BLOOM

There just seems to be no end of ways to use the Botanical Builder die set from SU! The greeting is from the Tin of Cards stamp set, which comes in handy often. The butterfly was punched out of a scrap of silver glitter paper and embellished with pearls for the body.
I find I'm using more dies than stamps lately? Are you?
Subscribe to:
Posts (Atom)