When I saw this design (in more than one place) I knew I had to give it a try!
Using Colorbox Chestnut Roan ink, I stamped the pine cone at 12, 3, 6 and 9 o'clock. Then I went around again in between the first four after stamping off on a piece of scrap paper. For more of a color variation, I switched inks to an Adirondack Rainbow pad, Woodlands. Keeping to the left side of the pad (the browns) I continued around the wreath, stamping twice without re-inking each time.
I'm amazed at how easy this was the first time around! I finished by adding the jute bow and greeting. Finally, I used Diamond Stickles on the pine cones to give it some sparkle.
For the Klass-y wreath which inspired me most, click HERE.
Thanks, Bonnie!
A site to post my latest hand-stamped greeting cards. BE SURE TO CLICK ON PHOTOS TO ENLARGE!
Tuesday, November 4, 2014
Monday, November 3, 2014
Sunday, November 2, 2014
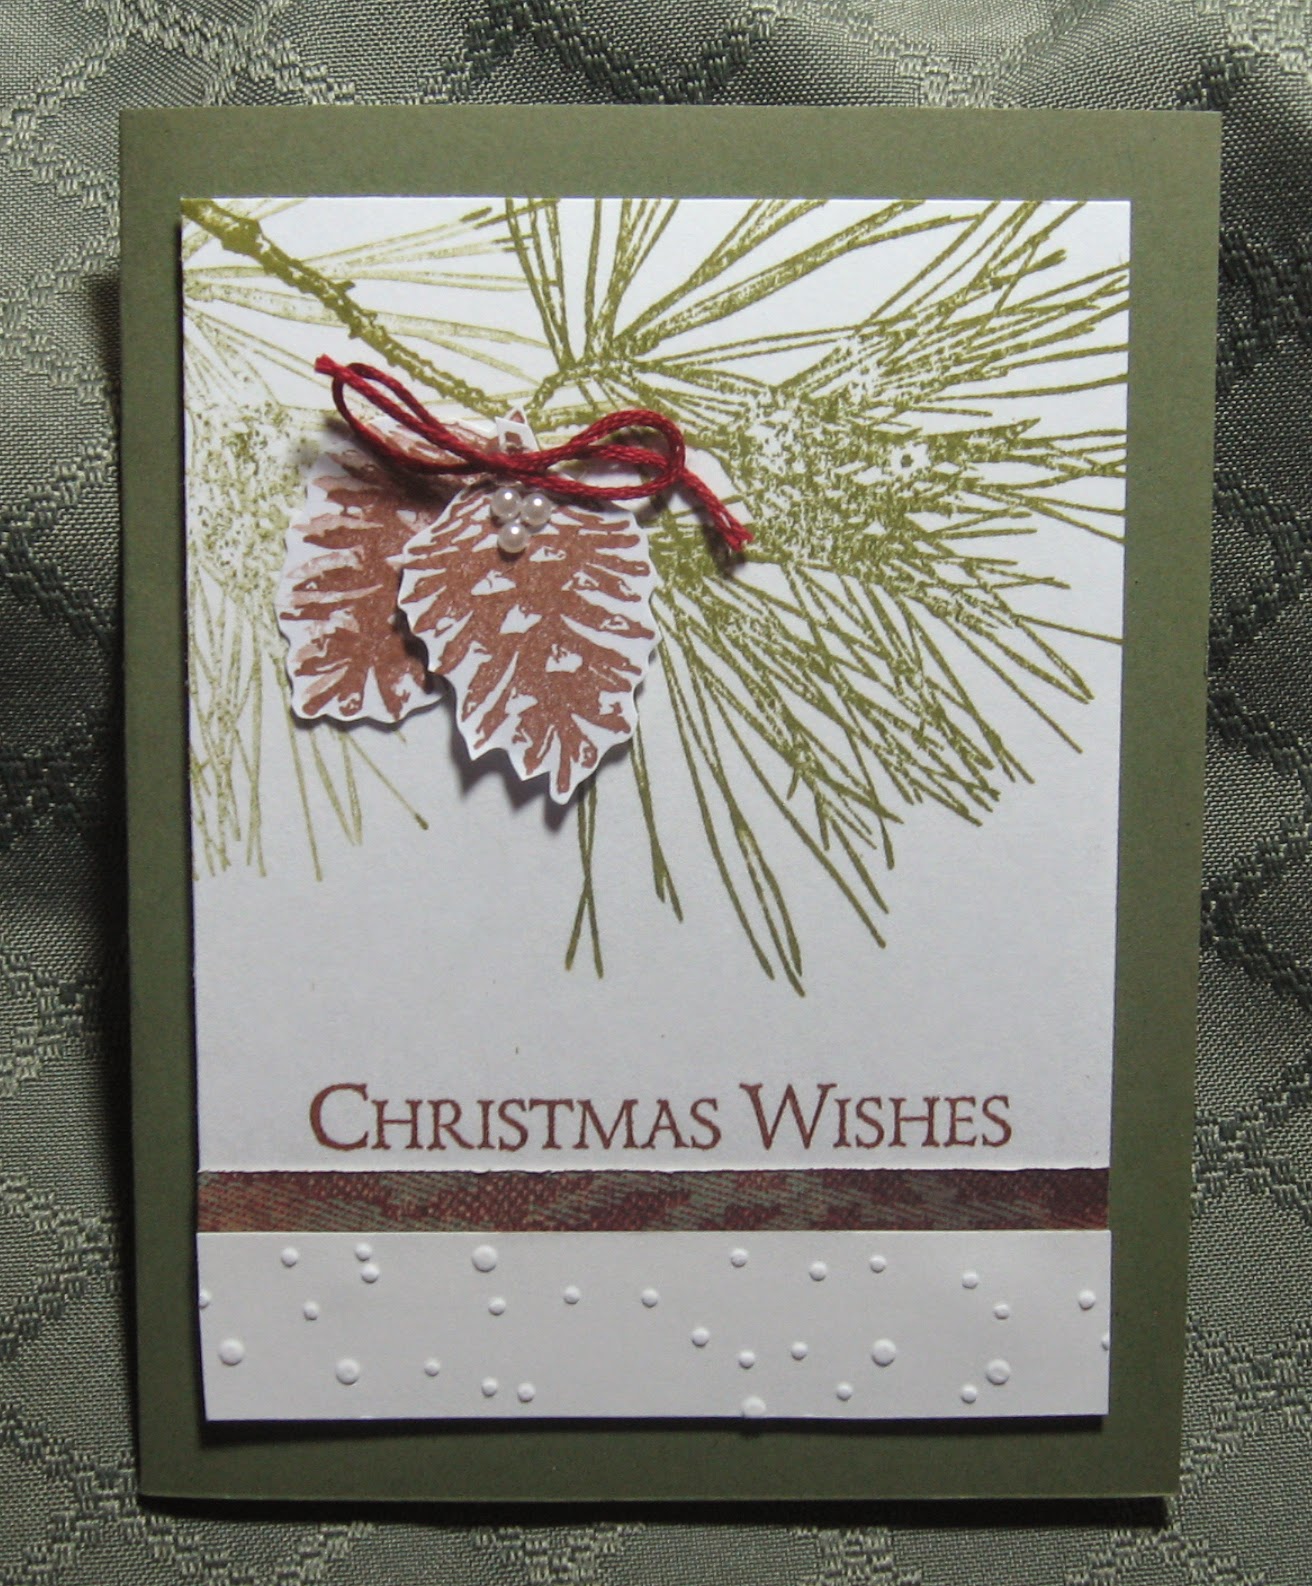
TEXTURED WISHES
Ever finish a card and feel like it needs "something" for a final touch? That's what happened here.
After stamping the pine branches and fussy cutting the two pinecones, I added the bow and greeting; but there was too much dead space at the bottom. At first, I added the thin strip of dsp which had the same color red as the bow. It still needed "something" however, but what???
Then I spied a piece of embossed cs that someone sent me ages ago (Bonnie, I think) and added it to the bottom. As Frenchie would say (on YouTube) "voila!" It was done!
TIP: Sometimes, all a card needs is a little texture to give it interest without distracting from the simplicity of the card.
After stamping the pine branches and fussy cutting the two pinecones, I added the bow and greeting; but there was too much dead space at the bottom. At first, I added the thin strip of dsp which had the same color red as the bow. It still needed "something" however, but what???
Then I spied a piece of embossed cs that someone sent me ages ago (Bonnie, I think) and added it to the bottom. As Frenchie would say (on YouTube) "voila!" It was done!
TIP: Sometimes, all a card needs is a little texture to give it interest without distracting from the simplicity of the card.
Saturday, November 1, 2014
Friday, October 31, 2014
ONE OF A KIND
The greeting was done using a vertical stamp with an ornament at the bottom which I cut off. (Sorry, I don't remember the company.) I cut it down to a banner and used it horizontally. After stamping two pine cones and fussy cutting them, I assembled the card.
First, I glued the vellum panel down and added a strip of dsp across the top of it. Then I added the pine cones, jute and greeting as shown. Finally, I added the SU brad on the bottom corner.
This card took about an hour from start to finish, hence the "one of a kind" label. The time spent includes the design idea and all the changes I made along the way. A second one would probably take about 15 minutes, but I'm not up for that with all the cards I still need to make. So far, I have 75 out of 100 done!
Thursday, October 30, 2014
CHRISTMAS GREENS
Funny, but I almost scrapped this one. When I started, the white panel was larger--too large for the effect I was going for. When I cut it down, there was too much white space even after I mounted it on the dark green cs.
To fix it, I sponged heavily along the card edges and lightly on the panel edges. Surprisingly, it worked!
Before attaching the panel to the card, I added the gold twine and gold-embossed pine cone. Then I used SU dimensionals to add it to the card front and another dimensional behind the pine cone.
Whew!
To fix it, I sponged heavily along the card edges and lightly on the panel edges. Surprisingly, it worked!
Before attaching the panel to the card, I added the gold twine and gold-embossed pine cone. Then I used SU dimensionals to add it to the card front and another dimensional behind the pine cone.
Whew!
Tuesday, October 28, 2014
ANOTHER FESTIVAL OF TREES CARD
First I stamped the trees with Versafine Smokey Gray, three times without re-inking. Next I stamped the greeting in Memento Paris Dusk and added the various sizes of snowflakes with the same blue ink. Once the stamping was done, I tore a narrow strip of white cs and added it to the bottom of the white panel and sponged the edges on the top and two sides. Then I glued it to the dark blue panel and mounted it on the gray card front.
The Mothers Class will be making this one on Wed.
Labels:
Christmas Cards,
Mothers Class,
Postage Friendly,
Stampin' Up
Monday, October 27, 2014
THREE OF A KIND--Holiday Knit
Another 3-of-a-kind card within the week! This one was inspired by a Tim Holtz stencil.
The stencil reminds me of a Scandinavian sweater, which gives the cards a warm, cozy feel. The easiest to work with was the round one done with Versamark and white embossing powder. The top right was done with white pigment ink and clear embossed to keep it from smearing. The bottom right was done with Versamark and clear embossing powder.
I think the first one is my favorite!
The stencil reminds me of a Scandinavian sweater, which gives the cards a warm, cozy feel. The easiest to work with was the round one done with Versamark and white embossing powder. The top right was done with white pigment ink and clear embossed to keep it from smearing. The bottom right was done with Versamark and clear embossing powder.
I think the first one is my favorite!
Thursday, October 23, 2014
THREE OF A KIND--Festival of Trees
The SU Festival of Trees set is so versatile with many possibilities!
This first one features stars at the bottom of the tree--imagine that! (Just my warped sense of humor at play here.) After punching out the tree and running it through the Cuttlebug for the stitched rectangle, we mounted the panel with dimensionals over the dsp so that it showed through and also formed a border.
The second card is a shaker design I came up with for my own
Christmas card stash. The tag is sandwiched with thin strips of
foam tape to form the shaker and mounted over the large dots dsp.
Finally, the three trees were stamped on green cardstock and punched out over the snowy background along a piece of torn white cs. Glitter was added for the snow.
These were all fun --and simple-- to make!
Do you know the story of The Three Trees? To make it short, one tree wanted to grow up and be a treasure chest. Another wanted to be a big ship, and the last wanted to grow tall and point to the sky. When it was time for them to be harvested, the first one became the manger for the baby Jesus. The second one was a fishing boat that held the fishermen and their Master who calmed the sea. Finally, the last was formed into a cross upon which the Final Sacrifice was made to take away our sins. What a beautiful Christmas story!
This first one features stars at the bottom of the tree--imagine that! (Just my warped sense of humor at play here.) After punching out the tree and running it through the Cuttlebug for the stitched rectangle, we mounted the panel with dimensionals over the dsp so that it showed through and also formed a border.
The second card is a shaker design I came up with for my own
Christmas card stash. The tag is sandwiched with thin strips of
foam tape to form the shaker and mounted over the large dots dsp.
Finally, the three trees were stamped on green cardstock and punched out over the snowy background along a piece of torn white cs. Glitter was added for the snow.
These were all fun --and simple-- to make!
Do you know the story of The Three Trees? To make it short, one tree wanted to grow up and be a treasure chest. Another wanted to be a big ship, and the last wanted to grow tall and point to the sky. When it was time for them to be harvested, the first one became the manger for the baby Jesus. The second one was a fishing boat that held the fishermen and their Master who calmed the sea. Finally, the last was formed into a cross upon which the Final Sacrifice was made to take away our sins. What a beautiful Christmas story!
Tuesday, October 21, 2014
CHRISTMAS BLESSINGS
This is one of those cards that looks better in real life!
However, I do like how it came out. The twine bow is on the stem of a popped up pine cone from the Ornamental Pine set. The greeting is from a Simon Says Stamp die cut set of "Christmas Blessings."
The plaid dsp is a deeper red than it appears here, giving it a richer look.
Monday, October 13, 2014
FESTIVAL OF TREES
This was an easy card for Mothers Class featuring another way to use this SU set and matching punch!
After stamping the tree, punching it out and adding rhinestones, we mounted it with dimensionals over a narrow strip of red foil paper. Then we attached the first half of the greeting on the front, and the second half inside with a gold star holding it down.
Simple but elegant...
After stamping the tree, punching it out and adding rhinestones, we mounted it with dimensionals over a narrow strip of red foil paper. Then we attached the first half of the greeting on the front, and the second half inside with a gold star holding it down.
Simple but elegant...
Sunday, October 12, 2014
Z-FOLD HALLOWEEN CARD
The second card we made last week was this one for Halloween. It couldn't have been easier!
First we folded back the front to form the Z. Next, we used the Candy Corn die cut from Simon Says Stamp by attaching it to a white panel with rounded corners, coloring in the candy corn with markers and adding tiny black gems in the spaces. After attaching the Halloween dsp to the front and inside panels, being careful to put adhesive on the left side only, we stamped the greeting on the inside over stars stamped in lilac. For the final touch, we added the black twine bow. It was a fun class!
Saturday, October 11, 2014
MY COMPUTER IS BACK!
...AND SO AM I!
Even though I haven't been able to post photos, I have been busy stamping. I now have 40 Christmas cards done (60 more to go..) YAY!
This Z-fold card was for Mothers Class last week. Although easy enough to do, it was time consuming because of all the steps and fussy cutting of the packages. The dsp is from a 12 x 12 pad from Hobby Lobby that I had left over from last year. The same Festival of Trees stamp set and punch has been (and will continue to be) used. They had fun sanding the Swiss Dots embossing. We added Stickles on all the red ornaments for extra shine.
It's been fun coming up with so many different ideas from the same stamp set. Stay tuned for more...
Even though I haven't been able to post photos, I have been busy stamping. I now have 40 Christmas cards done (60 more to go..) YAY!This Z-fold card was for Mothers Class last week. Although easy enough to do, it was time consuming because of all the steps and fussy cutting of the packages. The dsp is from a 12 x 12 pad from Hobby Lobby that I had left over from last year. The same Festival of Trees stamp set and punch has been (and will continue to be) used. They had fun sanding the Swiss Dots embossing. We added Stickles on all the red ornaments for extra shine.
It's been fun coming up with so many different ideas from the same stamp set. Stay tuned for more...
Labels:
Christmas Cards,
Mothers Class,
Postage Friendly,
Stampin' Up
Sunday, October 5, 2014
STILL NO COMPUTER
Hope you all had a fun World Cardmaking Day! I made some neat cards and had a relaxing rainy day in the Tower. Since my computer is ten years old, I may have to get a new one...we'll see... Waiting for the repairman to get back to us, probably tomorrow.
Thursday, October 2, 2014
GREETINGS FROM MY IPAD
My computer has died after having frozen up for weeks. I hope to get blogging again soon!
Tuesday, September 16, 2014
FROM THE TOWER
Just a note to let you know there will be some cards up soon. Not only have I had computer problems, but my dad had to be moved to Assisted Living. (very long story...) My sister and I have to vacate his apartment by the end of the month, so I've been driving the 100 miles each way to help my sister with all the arrangements. Dad is adjusting to his new home and seems much happier there, although I don't think he realizes yet that he won't be going back to his apartment or his car. It's been physically, mentally and emotionally exhausting; but we're almost done with the sorting and removal of things in his apartment--not to mention the mountains of paperwork!
The Lord has graciously gone before us every step of the way, and I couldn't have asked for a smoother transition. He's also kept me safe on the highways as I travel back and forth. AND my back problem cleared up! (miraculously)
Meanwhile, my daughter is having us over to celebrate my birthday on Sunday. It's one of those milestone birthdays, so I'm looking forward to being with family, especially the 4 grand kids.
"See" you after Mothers Class tomorrow!
The Lord has graciously gone before us every step of the way, and I couldn't have asked for a smoother transition. He's also kept me safe on the highways as I travel back and forth. AND my back problem cleared up! (miraculously)
Meanwhile, my daughter is having us over to celebrate my birthday on Sunday. It's one of those milestone birthdays, so I'm looking forward to being with family, especially the 4 grand kids.
"See" you after Mothers Class tomorrow!
Thursday, August 28, 2014
BELATED BIRTHDAY CARDS
Inside reads, "but I did." Now that we're back from OBX and I'm reasonably caught up around here, I had to make 5 belated birthday cards. This stamp set from Technique Tuesday worked perfectly for all of them.
Since I stamped the elephant on grey paper for this card, I wanted a brighter background. To make the elephant a bit more feminine, I added eyelashes with a black pen and a bow on "her" tail. The straw was done with thinly cut pieces of cardstock.
Two of the other cards had the elephant stamped on dsp and mounted on neutral cardstock.
Since I stamped the elephant on grey paper for this card, I wanted a brighter background. To make the elephant a bit more feminine, I added eyelashes with a black pen and a bow on "her" tail. The straw was done with thinly cut pieces of cardstock.
Two of the other cards had the elephant stamped on dsp and mounted on neutral cardstock.
Saturday, August 16, 2014
HEADING FOR THE SUN, SURF AND SAND!
We leave tomorrow for the Outer Banks--YAY!!
"See" you when we get back...
Saturday, August 2, 2014
BEFORE AND AFTER
The carpet in my stamping tower was here when we moved in 25 years ago, so I guess it was time for an update from the burnt orange and brown sculptured rug.
Jenny seemed content to luxuriate on the old carpeting, however.
The new smooth beige carpeting looks so much neater and makes the room look bigger. A happy change!
WHAT A CRAZY WEEK!
Just getting back to my "tower" after a week of one thing after another. Without going into details, my week included removing the small furniture from two guest rooms and the stamping tower in time for new carpeting to be installed on Tuesday. Unfortunately, I pulled my back out on Monday afternoon and am still not back to normal. With all the supplies in a stamping room, it took a lot of time and effort to empty the room and closet. Thankfully, Joan was able to come and help. I managed to take before and after pictures which I will post later on today. The whole process enabled me to purge all three rooms again. The new carpet makes the rooms look so much bigger and neater--worth waiting 25 years for!
After the carpet installers left, Joyce and Jan came to help me put everything back in the rooms where they belong. Later, I took a break in the sun on the back deck and got stung by a hornet...very nasty! It itched for three days after.
Wednesday and Thursday were spent restoring each room, all of which are finally done. Yesterday, Joan and I went to Wegman's to grocery shop--a 45-minute ride, but well worth it. My heated seats helped sooth my back during the ride, an added benefit.
Today I have a list of things to do and errands to run before leaving tomorrow for Long Island again. My sister will be on vacation, so I need to be there for my 96-year old dad. Although he lives in his own apartment a mile away from her house (amazing!) someone still needs to be available in case of a problem. I will take him to the adult day care center for Monday and Tuesday, then return home on Wednesday. I hope to relax on my sister's sunny deck; but I will definitely miss being able to stamp!
I sure hope next week is more relaxing...
After the carpet installers left, Joyce and Jan came to help me put everything back in the rooms where they belong. Later, I took a break in the sun on the back deck and got stung by a hornet...very nasty! It itched for three days after.
Wednesday and Thursday were spent restoring each room, all of which are finally done. Yesterday, Joan and I went to Wegman's to grocery shop--a 45-minute ride, but well worth it. My heated seats helped sooth my back during the ride, an added benefit.
Today I have a list of things to do and errands to run before leaving tomorrow for Long Island again. My sister will be on vacation, so I need to be there for my 96-year old dad. Although he lives in his own apartment a mile away from her house (amazing!) someone still needs to be available in case of a problem. I will take him to the adult day care center for Monday and Tuesday, then return home on Wednesday. I hope to relax on my sister's sunny deck; but I will definitely miss being able to stamp!
I sure hope next week is more relaxing...
Subscribe to:
Posts (Atom)